Sewing Machines

How to Stitch the Same Seam Length Over and Over

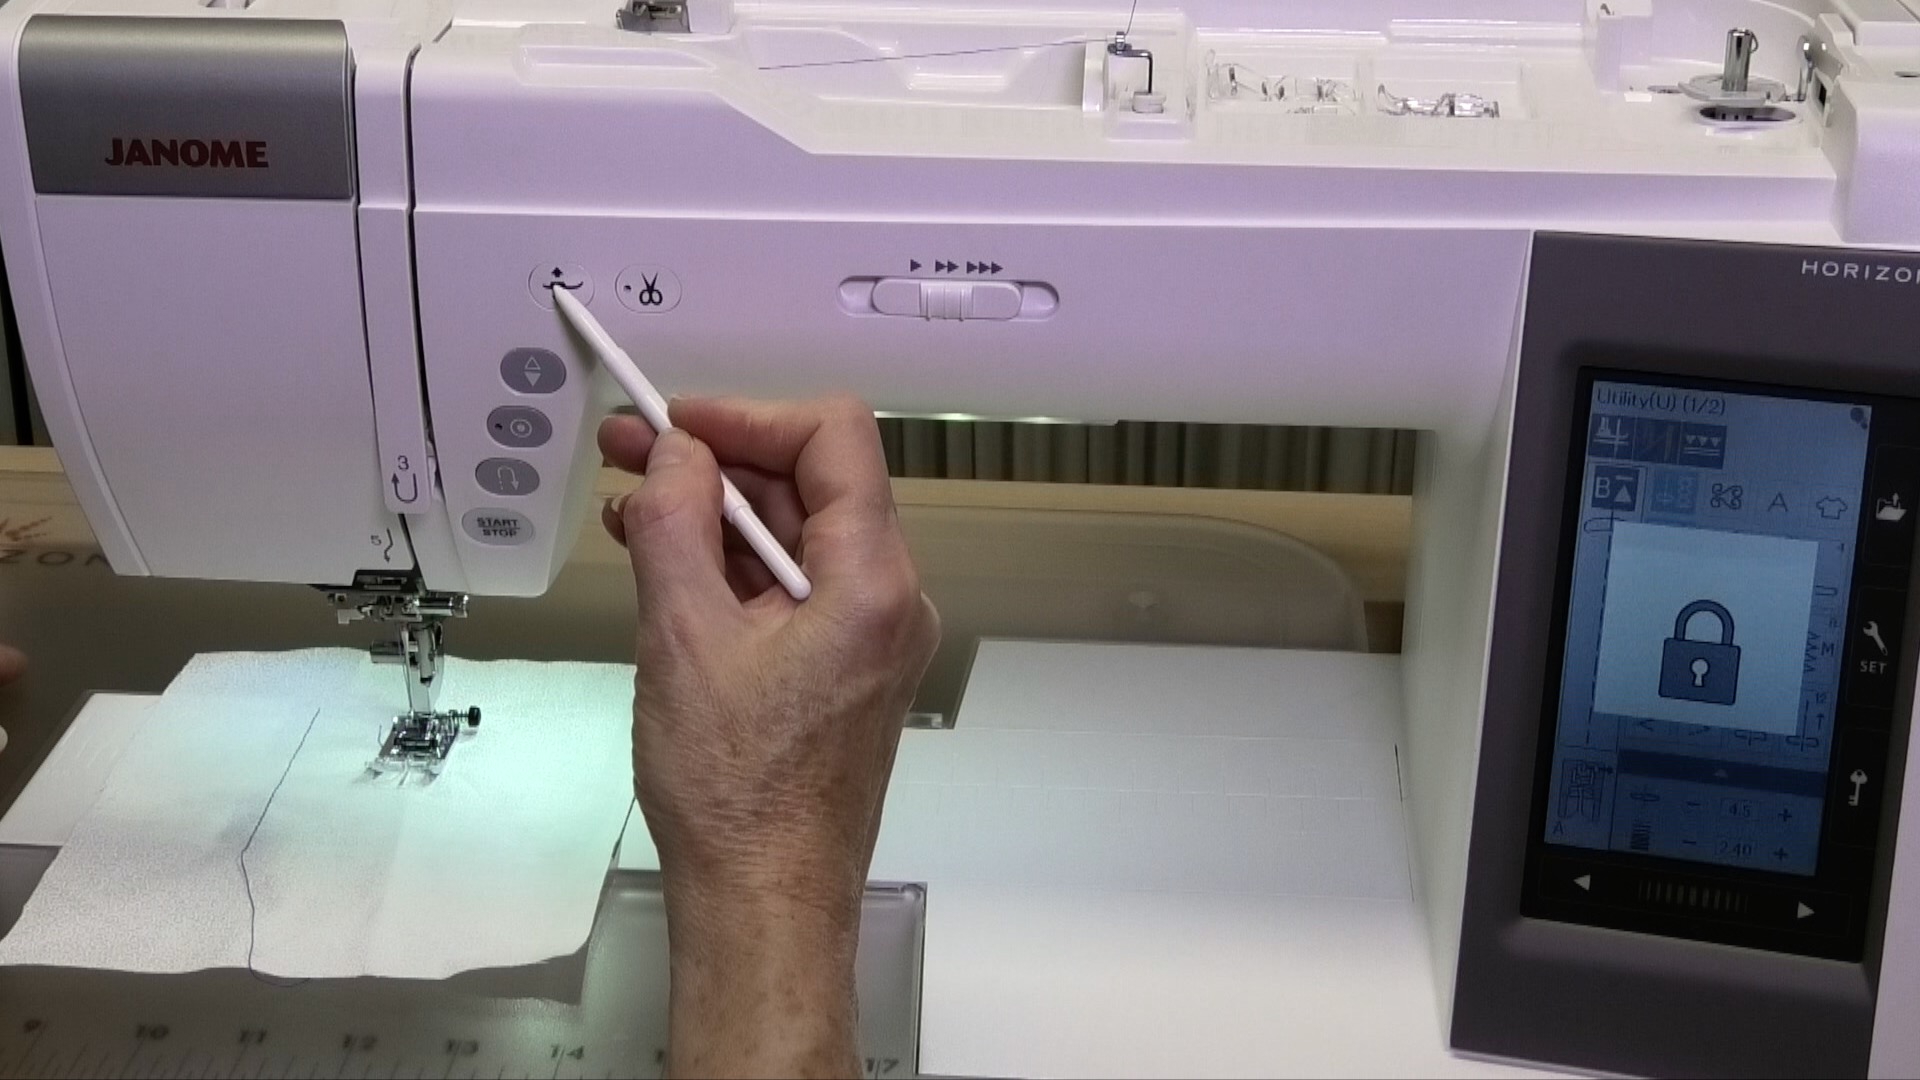
There is a feature on the Janome MC9400 that you may not know about: it’s the memorized quilt seaming feature. This feature can be very handy for specific stitching circumstances, such as when stitching partial seams.

 
Memorized Seam Quilting - Rows.jpg
 

If you wanted to use this feature when piecing a quilt top on the Janome MC9400, this is how you would do it.

 
Memorized Seam Quilting - Display Screen.jpg
 

You would go into the Sewing application (t-shirt icon), choose Patchwork and then Straight Stitch (#1) and stitch a seam. When you had finished stitching, you would notice a message on the display screen asking if you wanted to stitch another seam with the same size. You could click on “OK” and when you next started stitching, the machine would stitch a line of stitching exactly the same length as the one you had just previously stitched. If you didn’t want to stitch a seam the same length, just choose the “X” and you could then stitch any length of seam you wanted.

 
Memorized Seam Quilting - Screen when done.jpg
 

The memorized quilt seaming feature would be helpful for stitching partial seams in quilt blocks or other situations where you want to repeat the same length of stitching.

Click on the image below to see how to set up and use the memorized quilt seaming feature on the Janome MC9400.


See page 90 in your manual for more information on the memorized quilt seaming feature.

Creatively,

Kim's signature small aqua.jpg
 

DID YOU KNOW? Enrolment in The Quilter's Way is now open. If you want the solution to your quilting problems and become the best quilter you can be, you need to be a member! Join here.

P.S. Did you know that you can sign up to receive emails full of FREE quilting goodness? Click here to receive FREE content directly in your email inbox every few weeks from Chatterbox Quilts. I know you'll be glad you did!

Automatic Presser Foot Lifter Feature on the Janome MC9400

One of the very helpful features on the Janome MC9400 is the automatic presser foot lifter. You can set the machine so that every time you stop stitching, the needle goes down into the fabric and the presser foot automatically lifts up by pressing this button on the display screen. The presser foot will automatically go down again when you start to stitch.

 
Raise Your Presser Foot on the Janome MC9400 -1.jpg
 

I love these presser foot options on the Janome MC9400, but one thing that I didn’t love was that I often wanted the presser foot to lift higher and it took me a while to figure out how to do this as it isn’t in the machine’s manual. 


You can set the height of the presser foot to its highest point in the Settings area, but I want to be able to have the presser foot be set at a regular height and then just be able to push a button to have it raise to the highest height – yes, I’m fussy like that! 


Click on the image below to see how you can have the presser foot lift to its highest height on the Janome MC9400, without adjusting the height in the Settings area.


Creatively,

Kim's signature small aqua.jpg
 

Download the free Get Out of the Ditch! guide to learn how to start free motion quilting by clicking here.

P.S. Did you know that you can sign up to receive FREE emails full of quilting goodness? Just click here to receive FREE content directly in your email inbox every few weeks from Chatterbox Quilts. I know you'll be glad you did!

Getting an Even Seam on the Janome MC9400

Some people use masking tape or a stack of post-it notes or other methods to stitch a seam a specific distance from the sewing machine needle. If you own a Janome MC9400, there is another way to get an even seam.

 
Janome MC9400 Cloth Guide - Off.jpg
 

The Janome MC9400 comes with a cloth guide that will take the place of any of these solutions and ensure that you get an accurate seam as you stitch along. It is one of the accessories that you’ll find included when you buy the machine and sometimes quilters aren’t really sure what it is! It’s what you can use to stitch a perfect seam! The cloth guide can be set to whatever distance you want from the needle to keep an even seam. If you struggle to use the edge of your HP foot to get a perfect ¼” seam (a method I love to use when piecing!), you can use the HP foot, HP needle plate and the cloth guide for the best of all worlds.


To use the cloth guide, you need to remove the acrylic extension table from the Janome MC9400. The cloth guide snaps into place on the bed of the Janome MC9400 and can be moved closer or further away from the needle, depending on the width of the seam you want to stitch. This is especially helpful for garment sewing when you need a 5/8” seam.


Another way that I think the cloth guide would be really helpful would be when you want to stitch several rows of decorative stitches a specific distance from the hem or cuff of a garment. You could use the cloth guide to stitch the first line of decorative stitches and then adjust it to where you want the subsequent stitching to be. Information on how to attach and use the cloth guide can be found on page 26 in your Janome MC9400 manual.

Click on the photo below to watch a video showing you how to attach and use the cloth guide.


Creatively,

Kim's signature small aqua.jpg
 

BIG ANNOUNCEMENT: Enrolment in The Quilter's Way is now open. If you want the solution to your quilting problems and become the best quilter you can be, you need to be a member! Join here.

P.S. Did you know that you can sign up to receive emails full of FREE quilting goodness? Click here to receive FREE content directly in your email inbox every few weeks from Chatterbox Quilts. I know you'll be glad you did!

Walking Feet for the Janome MC9400

I really enjoy making improvisational quilt as you go (QAYG) projects and find that my AcuFeed Dual Foot and Holder (Twin) or AD foot that came with the Janome MC9400 is so helpful in quilting straight or wavy lines when I am making projects with this technique. If you're not familiar with the AD foot, you may recognize it as the walking foot or even feed foot. Yes, it's the one you will use for handling slippery fabrics, or, if you are a quilter, doing walking foot quilting. 

 
Cheryl's QAYG table runner - 10.jpg
 

I love using the AD foot, but have recently purchased an additional walking foot, the AcuFeed Foot with Foot Holder Single or VD foot. This foot is similar to the AD foot, but is narrower, allowing for use in areas where the AD foot may be just a bit too wide. 

 
Janome AD & VD foot.jpg
 

When I'm adding quilting to my QAYG projects, I like to use the edge of my presser foot to measure the space to where I want to lay down the next quilting line. When I want to have a narrow space between my quilting lines, the VD foot is perfect!

Both the AD foot and the VD foot work with the AcuFeed Flex system to move both the top and bottom fabrics along at the same rate. In order to use them with this system, you need to be sure that the AcuFeed Flex system is engaged on the Janome MC9400.

To see more information about both of these feet and how to use them with the AcuFeed Flex system on the Janome MC9400, click on the photo below.


Creatively,

Kim's signature small aqua.jpg
 

P.S. Did you know that you can sign up to receive emails full of FREE quilting goodness? Click here to receive FREE content directly in your email inbox every few weeks from Chatterbox Quilts. You'll be glad you did!

How to Use Two Spools of Thread on the Janome MC9400

I get lots of questions about the thread stand I use on my Janome MC9400 to handle thread cones. As I own a long arm machine, I have more thread cones than spools and needed a way to use these on the Janome MC9400, so I purchased the optional two spool thread stand. This stand works well for using thread cones as well as handling stacked threads that should feed vertically, rather than horizontally.

The two spool thread stand comes with two vertical thread stands, two thread guides as well as two thread caps and an attachment to handle cones that can be taken off the vertical thread stand when not needed. The thread guides consist of two interconnected extendable metal poles that will lock into place with a slight twist when you extend them. They can be collapsed when not in use.

 
Images for Canva - 11.jpg
 

The stand also comes with a small thread guide that fits into the round hole that you'll see when you open up the top of the Janome MC9400. It's important to check with your local Janome dealer to get the right two spool thread stand because they are machine specific. If you get the wrong one, you'll find that this small thread guide won't fit into the appropriate hole.

 
Images for Canva - 14.jpg
 

Fitting the two spool thread guide onto your machine is quite simple. At the back of the Janome MC9400 there are two screws. These need to be taken out and the protrusions on the thread guide will fit right in. You then screw the screws back into the machine, putting them through the holes in the two spool thread stand first. 

To learn more about the two spool thread stand and how to attach it to your Janome MC9400, click on the photo below to watch a video on my YouTube channel.

Creatively,

Kim's signature small aqua.jpg
 

P.S. Did you know that you can sign up to receive FREE emails full of quilting goodness? Just click here to receive FREE content directly in your email inbox every few weeks from Chatterbox Quilts. I know you'll be glad you did!