
Valentine's Day is fast approaching and I've got a sweet project for you - that won't add any extra calories to your diet!
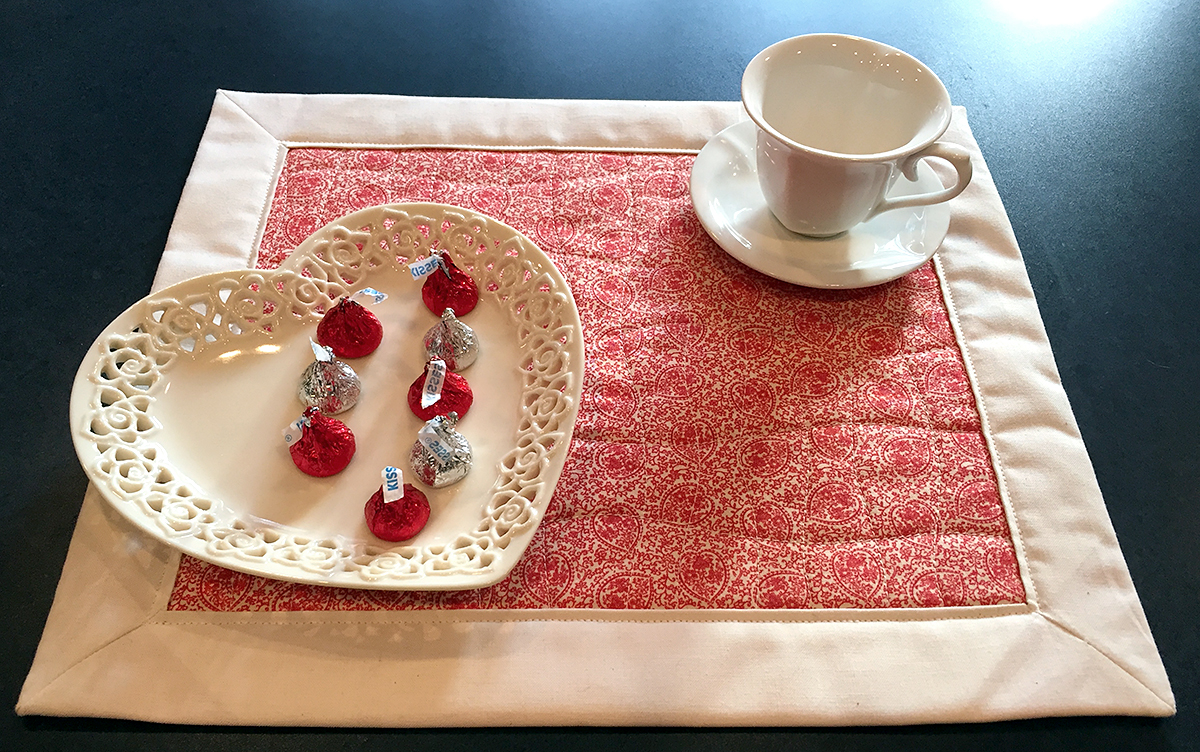
I like to make a special meal for my family on Valentine's Day and love to set the table with all things Valentine. This year I'll be setting my Valentine's Day table with a set of easy to make placemats that I created using my Janome Horizon Memory Craft 9400 QCP.
The AccuFeed Flex system on my Janome 9400 made it super easy to do the wavy line stitching I used on this project. It’s easy to see where I’m stitching and using the AccuFeed Flex system evenly feeds my fabric and batting together without any stretching of the top fabric. It’s one of my favourite features on the Janome 9400 and I know I’ll be doing more walking foot quilting with this machine.
These placemats are so quick and easy to make, but the best part is that they don't require any binding.
Let me explain what you'll need for this project:
2 Fat Quarters - one solid fabric and one patterned (preferably with a heart-filled fabric)
Batting – I would suggest 100% cotton low loft batting
That Purple Thang or similar to push out corners (include Amazon link)
Usual quilting supplies
That's about it! See, I told you it would be simple!
You'll also need a good sewing machine, of course, which in my case is the Janome Horizon Memory Craft 9400 QCP. It was my best helper as I used the walking foot and AccuFeed Flex system on the machine for the quilting.
Since I wanted to make a set of placemats for Valentine’s Day, I used a heart-patterned vintage feeling fabric for the centre of the placemat and the solid fabric for the borders and backing (it’s all one piece).
You'll need to decide on what you want the finished size of the placemat to be and cut the fabric you’ve chosen for your placemat centre and your batting to this size. In my example, I used a 12” x 14” piece of fabric and this would be the actual size of my placemat.
Now, let’s get into a bit of math: don’t worry, it’s really not that complicated – believe me, if it was, it wouldn’t be me telling you about it!
To determine the cut size of the backing/border fabric (solid fabric in my example), decide on the size you want the borders to be. I wanted the borders to be 1½” wide. I then multiplied this number by 4: 1½” x 4 = 6” and added this amount to the length of the centre fabric. This was 14” + 6” = 20”.
I then did the same calculation for the width of the centre fabric, which was 12”. There were also 1½” wide borders on the top and bottom, so I multiplied this by 4: 1½” x 4 = 6” and added this to the centre fabric width of 12” for a total of 18” (6” + 12”).
Still with me?
The figures that we just calculated are the size that you’ll be cutting from the backing/border fabric. So, in my example, I cut a piece of fabric 18” wide by 20” long and this would be the backing and borders on the placemat.
Just to review: the centre fabric and batting were cut 12” x 14” and the backing was cut 18” x 20”.
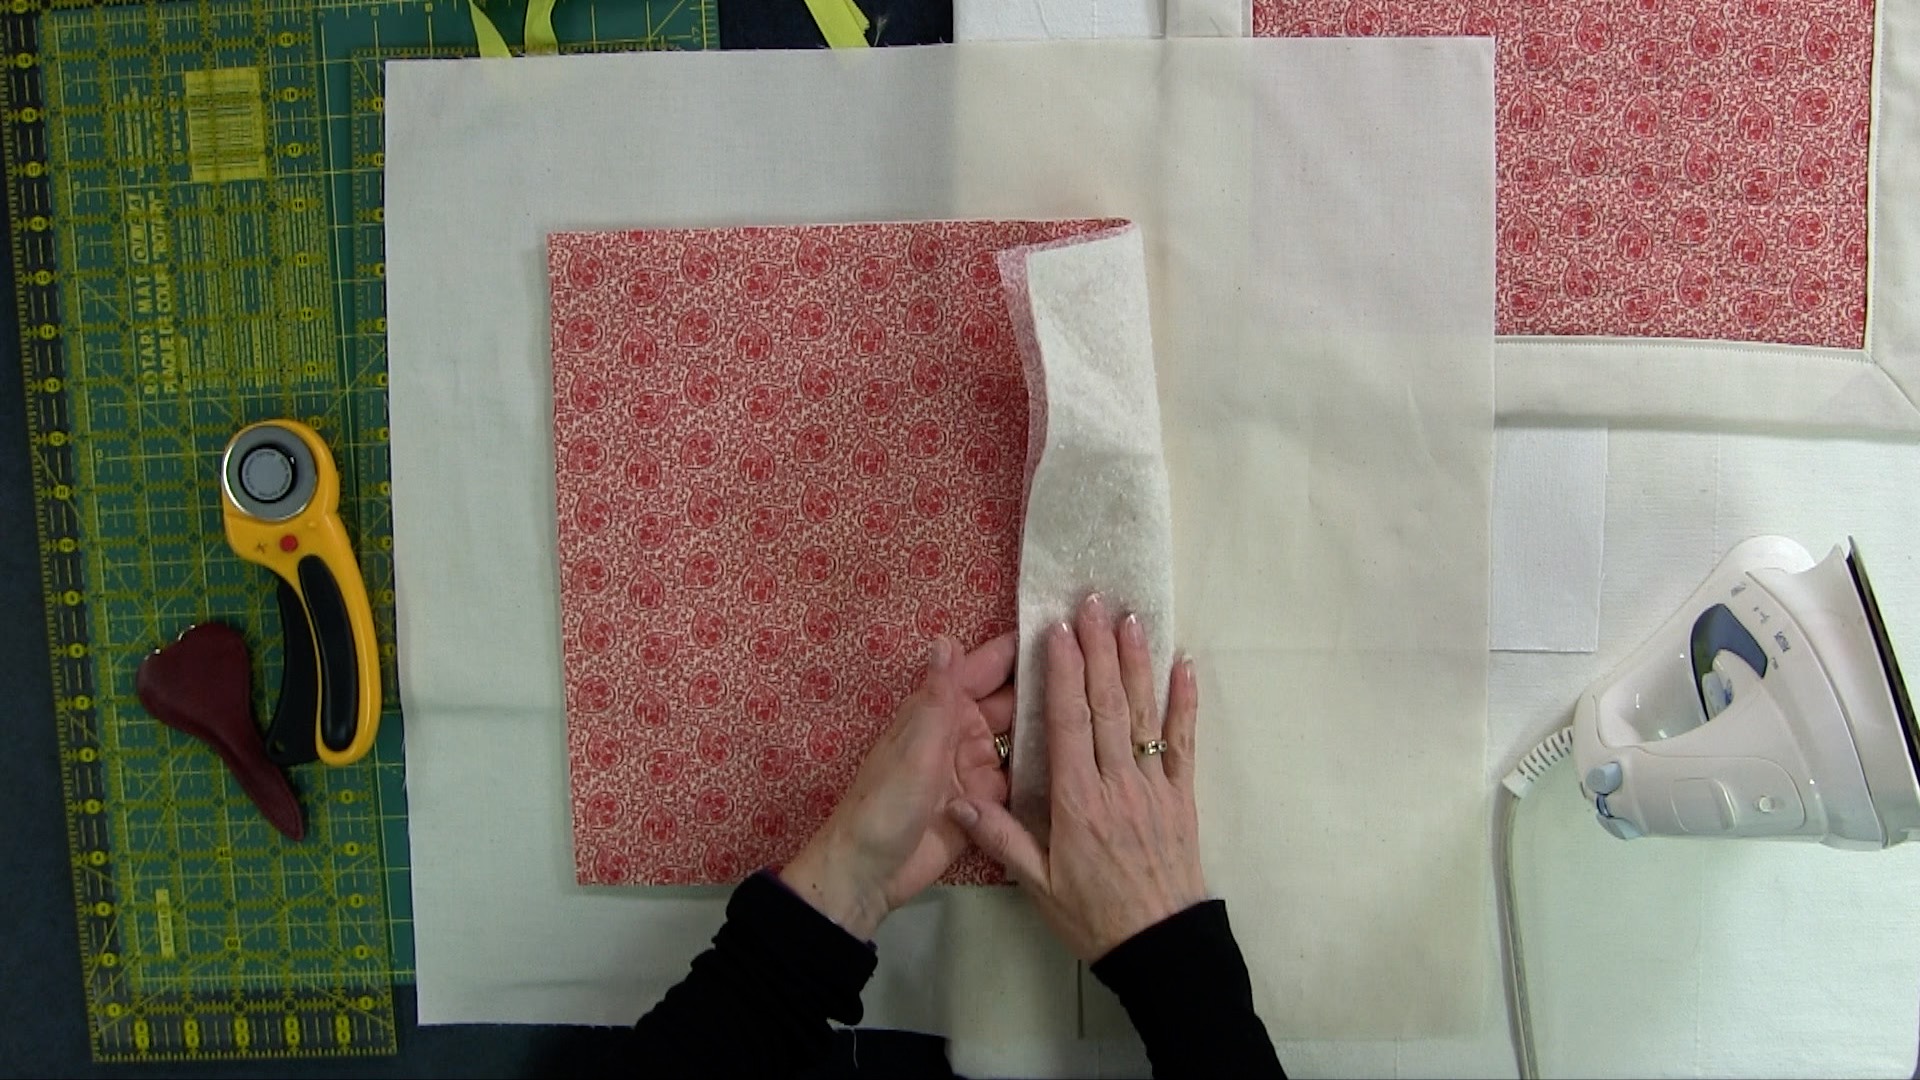
Top and Batting cut to 12" x 14" with Backing cut to 18" x 20"
The next step in the placemat construction is to quilt the top and batting together. I used the walking foot on my Janome 9400 to do this and did some wavy line quilting vertically and horizontally. This was fun and so easy with the help of the AcuFeed Flex system on the Janome 9400. No bunched fabric and it kept both the batting and fabric together without even using pins!

Quilting the top and batting with the Janome Horizon Memory Craft 9400 QCP's amazing walking foot with AcuFeed Flex system
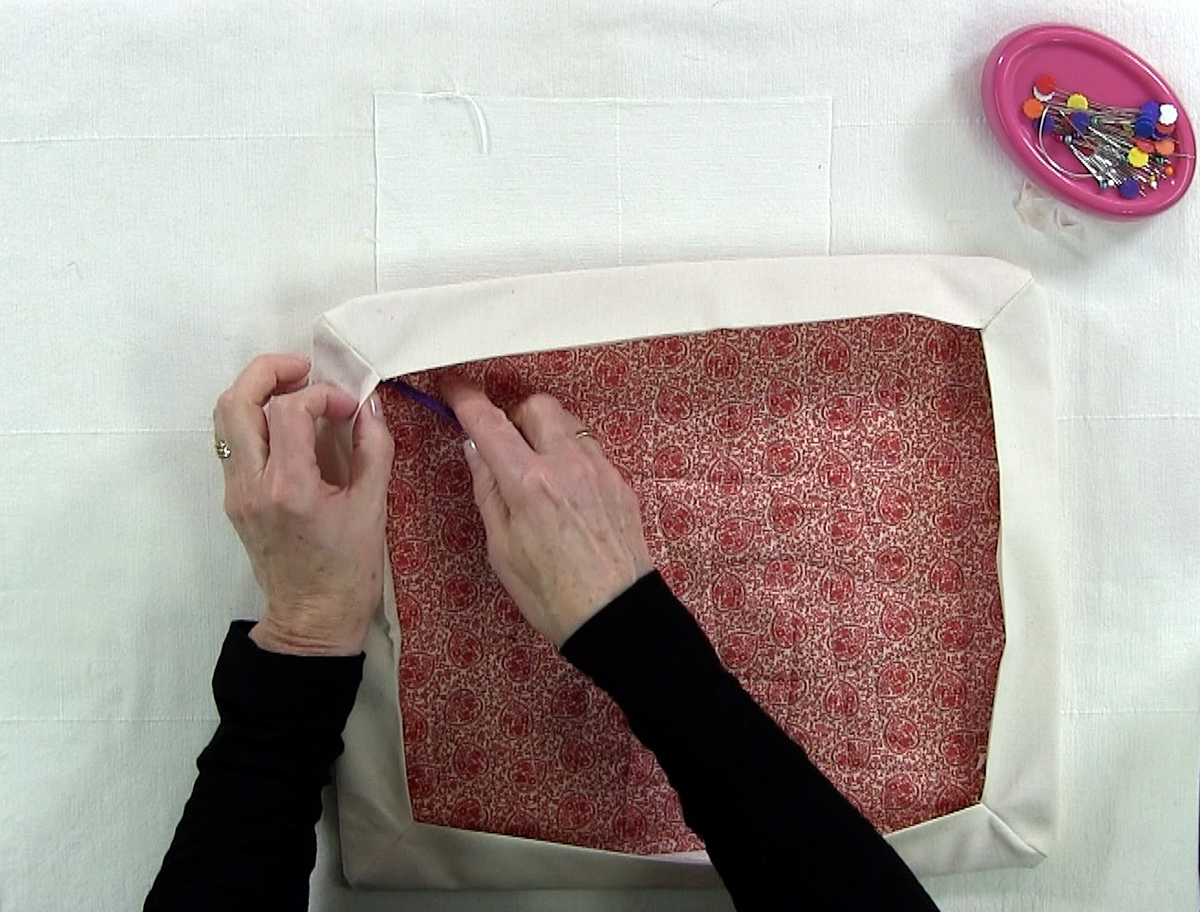
After the quilting is finished, it’s time to centre the quilted top onto the backing and then stitch everything together ¼” in from the outside edge of the quilted centre. You may find pins helpful here to keep everything in place.

Be sure to centre the quilted top and batting when you are pinning it to the backing
This next part is when the mitered corners are created and it’s almost like magic! Trim off all 4 corners of the backing on a diagonal to remove excess fabric. Be sure that you are ¼” away from the corner of the quilted centre.

Trim off the excess batting on a diagonal
Fold in each of the sides (the backing) to meet the quilted centre and press them to keep them in place.

Press the sides to keep them in place
Flip the placemat over and match adjacent sides, being sure to line up at the corner and down the side. Pin to keep in place.

Line up adjacent sides and pin to prepare for stitching
Once everything is pinned properly – don’t make the mistake I did – you can stitch the seam at each corner with a ¼” seam.

Be sure to backstitch at the beginning and end to hold the seam in place
When you have finished this stitching, you can trim the excess fabric and batting on the corners and then flip the corners out to the front and push out all the corners using That Purple Thang or similar tool (be careful not to poke too aggressively or you may end up with a hole in your corner!).
Push corners out gently with That Purple Thing or similar tool
Press the placemat down and then topstitch the open edge all around the interior of the placemat with a ¼” seam or you could use a decorative stitch. If you want to do additional quilting in the border, you could do that too.
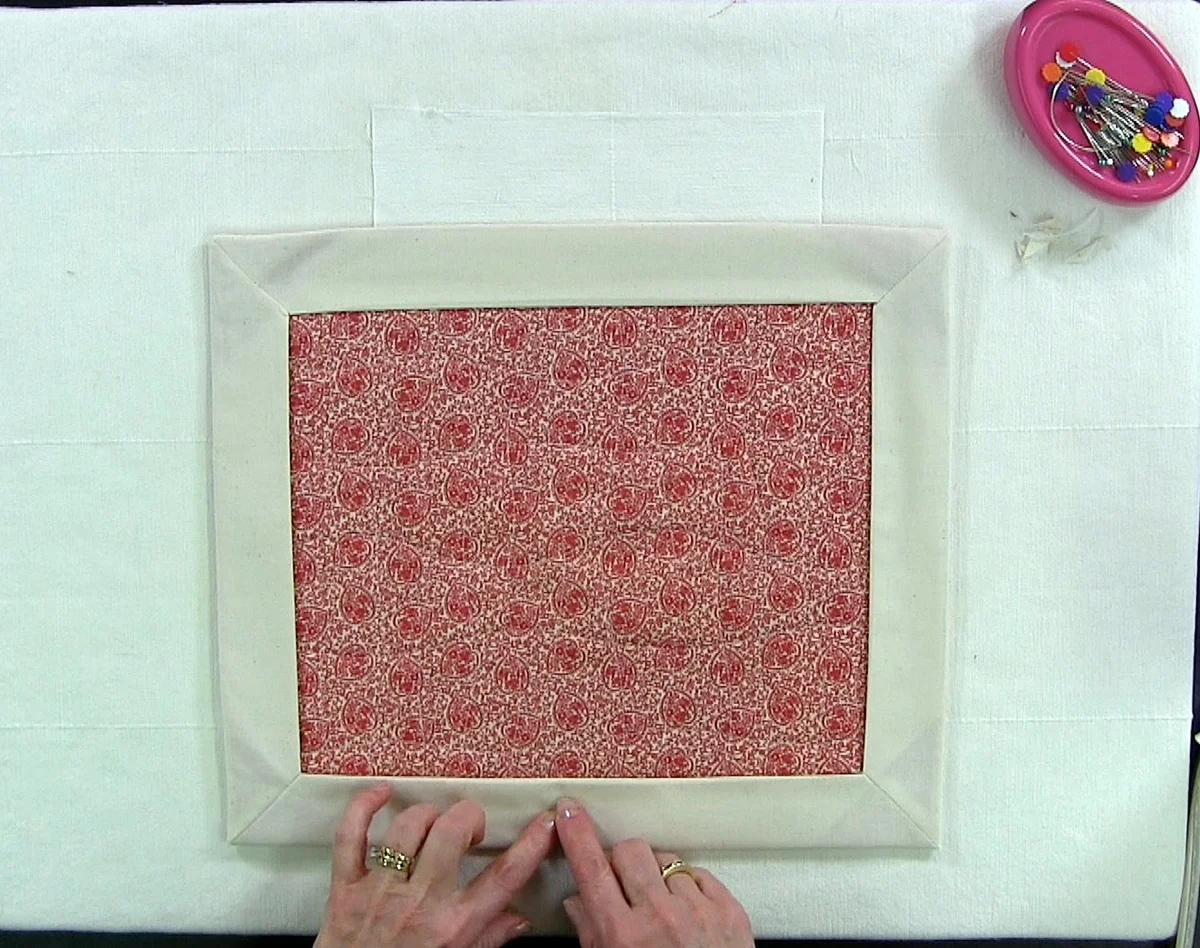
Topstich 1/4" in from edge to complete the placemat
Now that you’ve seen how easy it is to make one of these placemats, keep going so you’ll have a complete set of 4 or 8 or…?
I think that a set of placemats would make a perfect wedding or house warming gift and with this pattern you can design them to any size you want.

This was the first time I’d used the walking foot for quilting and I was pleased at how easy the AcuFeed Flex system on the Janome Horizon Memory Craft 9400 QCP made it. I’ll definitely be doing more walking foot quilting on future projects.
Click on the image below to view a video on my YouTube channel that shows you the step-by-step process to make these easy placemats.

Click here if you would like to see my favourite quilting tools.
I hope you'll try creating these easy placemats on your own. You could make a set for every holiday!
Creatively,

Download the free Get Out of the Ditch! guide to learn how to start free motion quilting by clicking here.
P.S. Are you serious about improving your quilting? Do you want to connect with other committed quilters in a supportive, safe environment? If you answered “yes” to these questions, you need to join The Quilter’s Way. The Quilter’s Way is the only quilting membership site that includes both training and an active, supportive online community. Don’t wait another day! Join now.
P.P.S. Did you know that you can sign up to receive emails full of FREE quilting goodness? Click here to receive FREE content directly in your email inbox every few weeks from Chatterbox Quilts. I know you'll be glad you did!
P.S. I am an Amazon affiliate and, if you purchase items by clicking through the links in this post ,I will receive a small amount of commission. This doesn’t cost you any more $$$, but helps me to continue creating free content for you. Thanks!