
CHATTERBOX QUILTS’ BLOG
Helping Quilters Learn and Improve

Easy Valentine's Day Heart Ornament
Valentine’s Day may still be a month away, but it’s never too early to start making heart-felt ornaments to decorate your quilt studio.

This is a project that only uses a bit of fabric, batting, and ribbon or trim for the hanging loop. Once you have these materials assembled, it’s time to go to your sewing machine to stitch it up.
I used the monogram feature and decorative stitches on the Janome MC9400 to embellish a sweet heart ornament. It’s easy to do and so fun to personalize by creating the phrases that are most “Valentine-y” to you. To learn more about using these features on the Janome MC9400, click here.
I recommend that you create and stitch out your phrases on a trial piece of quilt sandwich so you’ll be sure that they are exactly the way you want them to be before stitching them on your “real” ornament. I created “XOXO” (hugs and kisses), “Kisses” and “Sweetheart” with the monogram feature on the Janome MC9400 to use on my ornament. I stitched these out in various fonts until I found the ones that I liked the best. I was then all ready to add them to my heart ornament.

With several hundred decorative stitches available to use on the Janome MC9400, it was tough to determine which ones I wanted to use, so I kept it simple: I used some hearts (D13) and then chose one of the stitches in the Decorative category (D21) for the edge stitching. While it’s easy to get carried away with the decorative stitches, try not to do this or you’ll lose the effect of them on this size of ornament. For this project, simple is the best way to go.

For all the details on how to create your own heart ornament in time for Valentine’s Day, click on the image below for the video tutorial.

What words or phrases would you use on your Valentine’s Day ornament? Let me know in the comments below.
Creatively,

P.S. Do you want to enhance your quilting and connect with other quilters from around the world? If you answered “yes” to this question, you need to join The Quilter’s Way. The Quilter’s Way is the only quilting membership site that includes both training and an active, supportive online community. Don’t wait another day! Join now.
P.P.S. Did you know that you can sign up to receive emails full of FREE quilting goodness? Click here to receive FREE content directly in your email inbox every few weeks from Chatterbox Quilts. I know you'll be glad you did!
Best Tips for Adding Monograms or Letters to a Project
In a previous YouTube video, I showed you how to use the Monogram feature on the Janome MC9400 to create words or phrases. Since then I’ve been thinking about projects to which I could apply these. I thought that it would be fun to create inspirational phrases or personal sayings and then stitch these onto a project, such as a purse or tote bag. Since I’ve recently been making easy pouches, I thought that stitching phrases on them would be a perfect way to personalize them. I discovered that there are several tips that you need to be aware of when you are using the monogram feature on projects.
1. Create Your Phrases
Decide what phrases or words you want to add to your project and create these in advance. If you don’t know how to use the Monogram feature on the Janome MC9400, check out this video. If you have another brand of sewing machine, check your manual for instructions on how to create and save phrases. Creating your words first saves time and ensures that you have already made any adjustments to size or spacing that you need to do so it will be perfect on your project. I always like to stitch the words or phrases out on the same type of fabric or material that you will be using in your project. Once you make sure that everything is looking good, you can store these words in your Janome MC9400 internal storage or on a separate USB.
2. Use fabric stabilizer, if necessary
When I made my pouch I was actually stitching on a quilt sandwich – top, batting and backing – so I didn’t need to use any stabilizer as this was thick enough to support my stitches. If you are sewing on one layer of fabric, you will definitely need fabric stabilizer. Don’t skip this step - it makes all the difference in the finished result.
3. Decide where you want to add the phrases
When creating my pouch, I realized that there was no point in adding phrases to the bottom of it as this wouldn’t normally be seen. You could, of course, continue your stitching all around your project, but I didn’t think that this would be necessary in this particular case. By not stitching all the way around the pouch, I saved thread - and time!
4. Remember the seam allowance
When you are making a project there will be seam allowances, so you need to take this into account when stitching. You want to ensure that your stitches will be on the project and not in the seam allowance.
5. Determine the width between your lines of stitching
Decide the optimal spacing between your lines of stitching so you can ensure that your stitching will be seen on your project. Once you’ve determined this, mark your project with an erasable marker and ruler so you will have the same distance between each line of stitching. I like to use a Frixion pen for this, but any type of erasable pen will do. If your machine has a quilting guide bar, like the Janome MC9400 does, you could use this instead. For my pouch I used ¾” between each line of stitching.
6. Use your walking foot
I found that using the walking foot and the AcuFeed Flex system on the Janome MC9400 worked very well for this application. It moved all the layers along evenly and ensured a smooth finish to the phrases. For more information on using the AcuFeed Flex system on the Janome MC9400, click here.
7. Measure your monograms
Measure and record this for each of the phrases or words being used. You will need to know this when stitching onto your project. When I created my first pouch, I found that I could stitch some of the phrases more than once while others would only fit once across the pouch.
8. Determine Your Starting Point
If you are making a pouch, you will want the stitching to start on either side of the zipper and then go down the sides of the pouch parallel to the zipper. This will ensure an even look to the stitching on the project. This may not be necessary, depending on the project on which you are stitching, but consider it before you start stitching.
Regardless of the project, you will need to make a mark on it as to where each line of stitching should start. You will want the lines of stitching to be centred width-wise on your project, so use an erasable marker to mark where you will start your stitching.
Click on the image below to watch a video on how I added monograms to a simple pouch project.

It was really fun to use the Monogram feature on the Janome MC9400 to create personal phrases and then to stitch them on my own pouch. I think this would be perfect gift for your quilting friends. Stitch up a pouch, add some personalized monograms or phrases to it, and fill it with quilty goodness - which would include chocolate, of course!
Creatively,

P.S. Do you want to enhance your quilting and become the best quilter you can be? If you answered “yes” to this question, you need to join The Quilter’s Way. The Quilter’s Way is the only quilting membership site that includes both training and an active, supportive online community. Don’t wait another day! Join now.
P.P.S. Did you know that you can sign up to receive emails full of FREE quilting goodness? Click here to receive FREE content directly in your email inbox every few weeks from Chatterbox Quilts. I know you'll be glad you did!

How to Stitch the Same Seam Length Over and Over
There is a feature on the Janome MC9400 that you may not know about: it’s the memorized quilt seaming feature. This feature can be very handy for specific stitching circumstances, such as when stitching partial seams.

If you wanted to use this feature when piecing a quilt top on the Janome MC9400, this is how you would do it.

You would go into the Sewing application (t-shirt icon), choose Patchwork and then Straight Stitch (#1) and stitch a seam. When you had finished stitching, you would notice a message on the display screen asking if you wanted to stitch another seam with the same size. You could click on “OK” and when you next started stitching, the machine would stitch a line of stitching exactly the same length as the one you had just previously stitched. If you didn’t want to stitch a seam the same length, just choose the “X” and you could then stitch any length of seam you wanted.

The memorized quilt seaming feature would be helpful for stitching partial seams in quilt blocks or other situations where you want to repeat the same length of stitching.
Click on the image below to see how to set up and use the memorized quilt seaming feature on the Janome MC9400.

See page 90 in your manual for more information on the memorized quilt seaming feature.
Creatively,

DID YOU KNOW? Enrolment in The Quilter's Way is now open. If you want the solution to your quilting problems and become the best quilter you can be, you need to be a member! Join here.
P.S. Did you know that you can sign up to receive emails full of FREE quilting goodness? Click here to receive FREE content directly in your email inbox every few weeks from Chatterbox Quilts. I know you'll be glad you did!

Automatic Presser Foot Lifter Feature on the Janome MC9400
One of the very helpful features on the Janome MC9400 is the automatic presser foot lifter. You can set the machine so that every time you stop stitching, the needle goes down into the fabric and the presser foot automatically lifts up by pressing this button on the display screen. The presser foot will automatically go down again when you start to stitch.
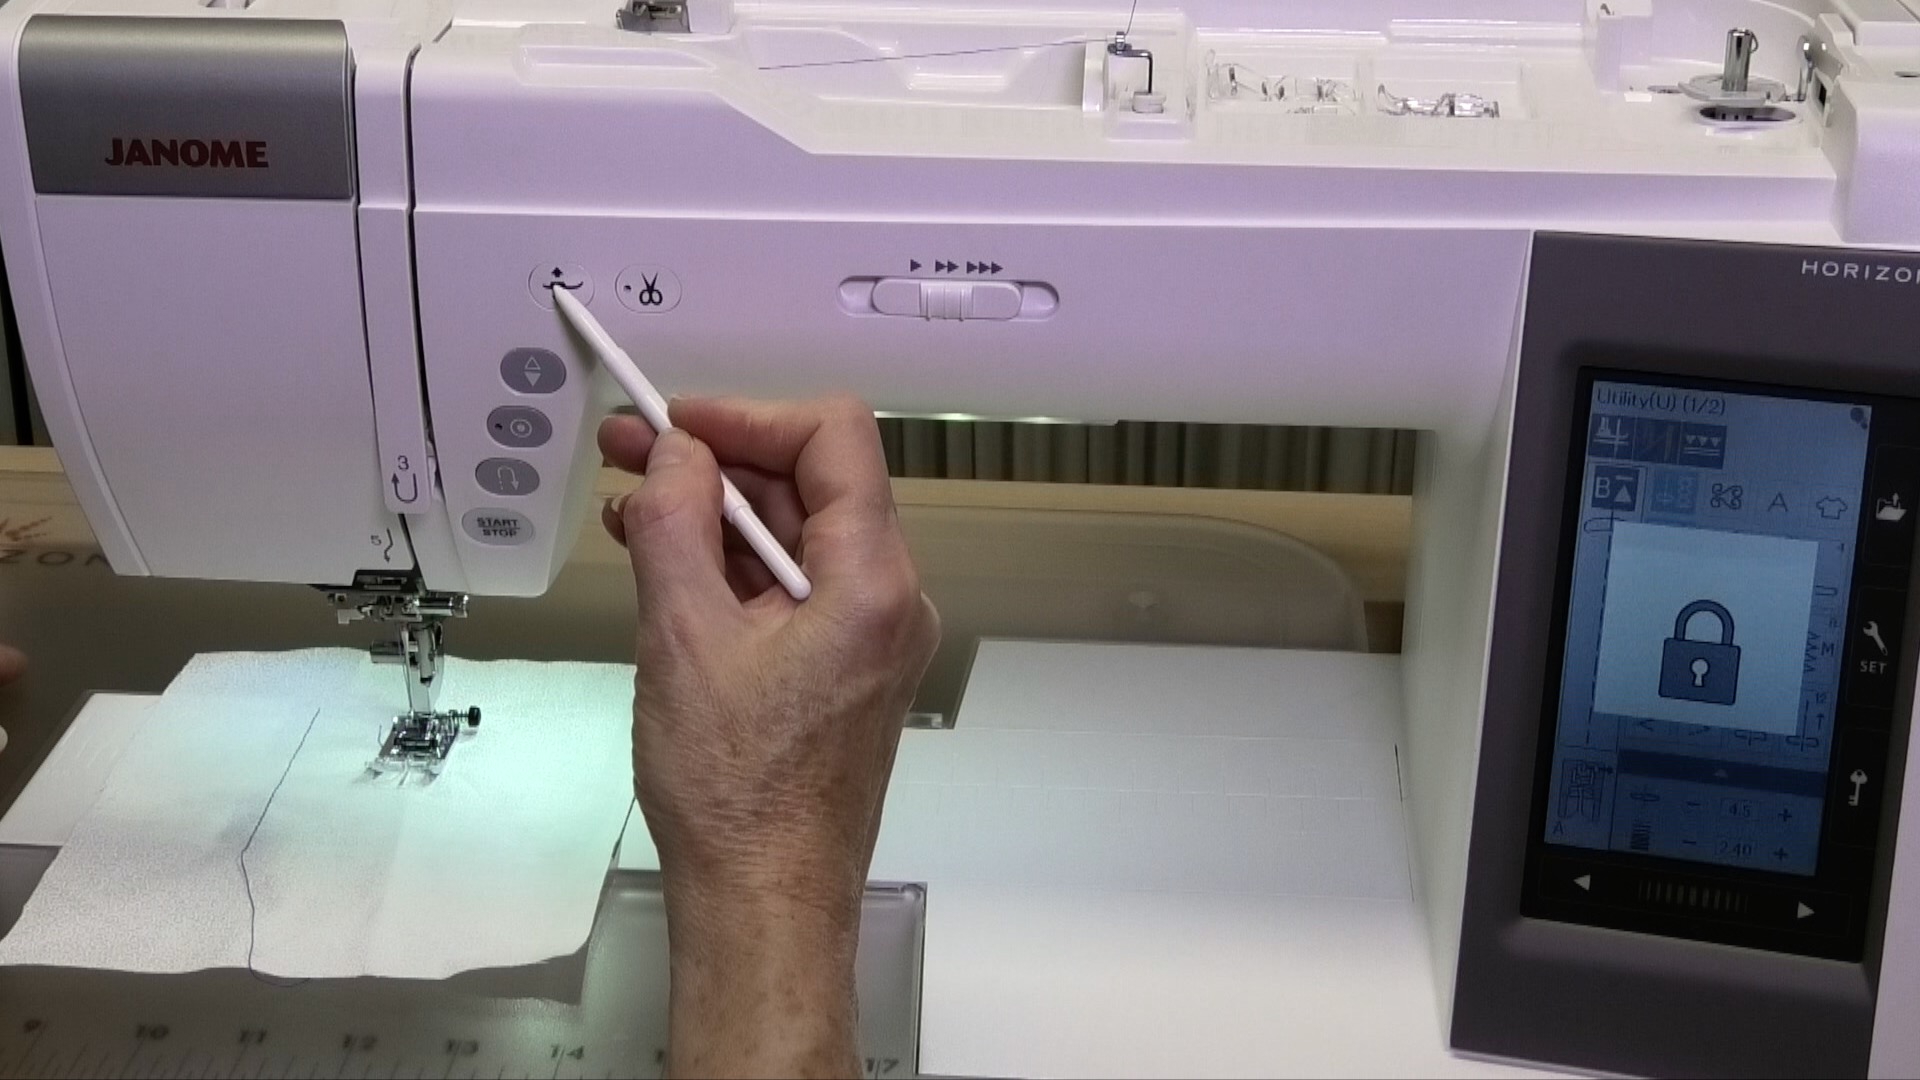
I love these presser foot options on the Janome MC9400, but one thing that I didn’t love was that I often wanted the presser foot to lift higher and it took me a while to figure out how to do this as it isn’t in the machine’s manual.

You can set the height of the presser foot to its highest point in the Settings area, but I want to be able to have the presser foot be set at a regular height and then just be able to push a button to have it raise to the highest height – yes, I’m fussy like that!
Click on the image below to see how you can have the presser foot lift to its highest height on the Janome MC9400, without adjusting the height in the Settings area.

Creatively,

Download the free Get Out of the Ditch! guide to learn how to start free motion quilting by clicking here.
P.S. Did you know that you can sign up to receive FREE emails full of quilting goodness? Just click here to receive FREE content directly in your email inbox every few weeks from Chatterbox Quilts. I know you'll be glad you did!

Getting an Even Seam on the Janome MC9400
Some people use masking tape or a stack of post-it notes or other methods to stitch a seam a specific distance from the sewing machine needle. If you own a Janome MC9400, there is another way to get an even seam.

The Janome MC9400 comes with a cloth guide that will take the place of any of these solutions and ensure that you get an accurate seam as you stitch along. It is one of the accessories that you’ll find included when you buy the machine and sometimes quilters aren’t really sure what it is! It’s what you can use to stitch a perfect seam! The cloth guide can be set to whatever distance you want from the needle to keep an even seam. If you struggle to use the edge of your HP foot to get a perfect ¼” seam (a method I love to use when piecing!), you can use the HP foot, HP needle plate and the cloth guide for the best of all worlds.

To use the cloth guide, you need to remove the acrylic extension table from the Janome MC9400. The cloth guide snaps into place on the bed of the Janome MC9400 and can be moved closer or further away from the needle, depending on the width of the seam you want to stitch. This is especially helpful for garment sewing when you need a 5/8” seam.
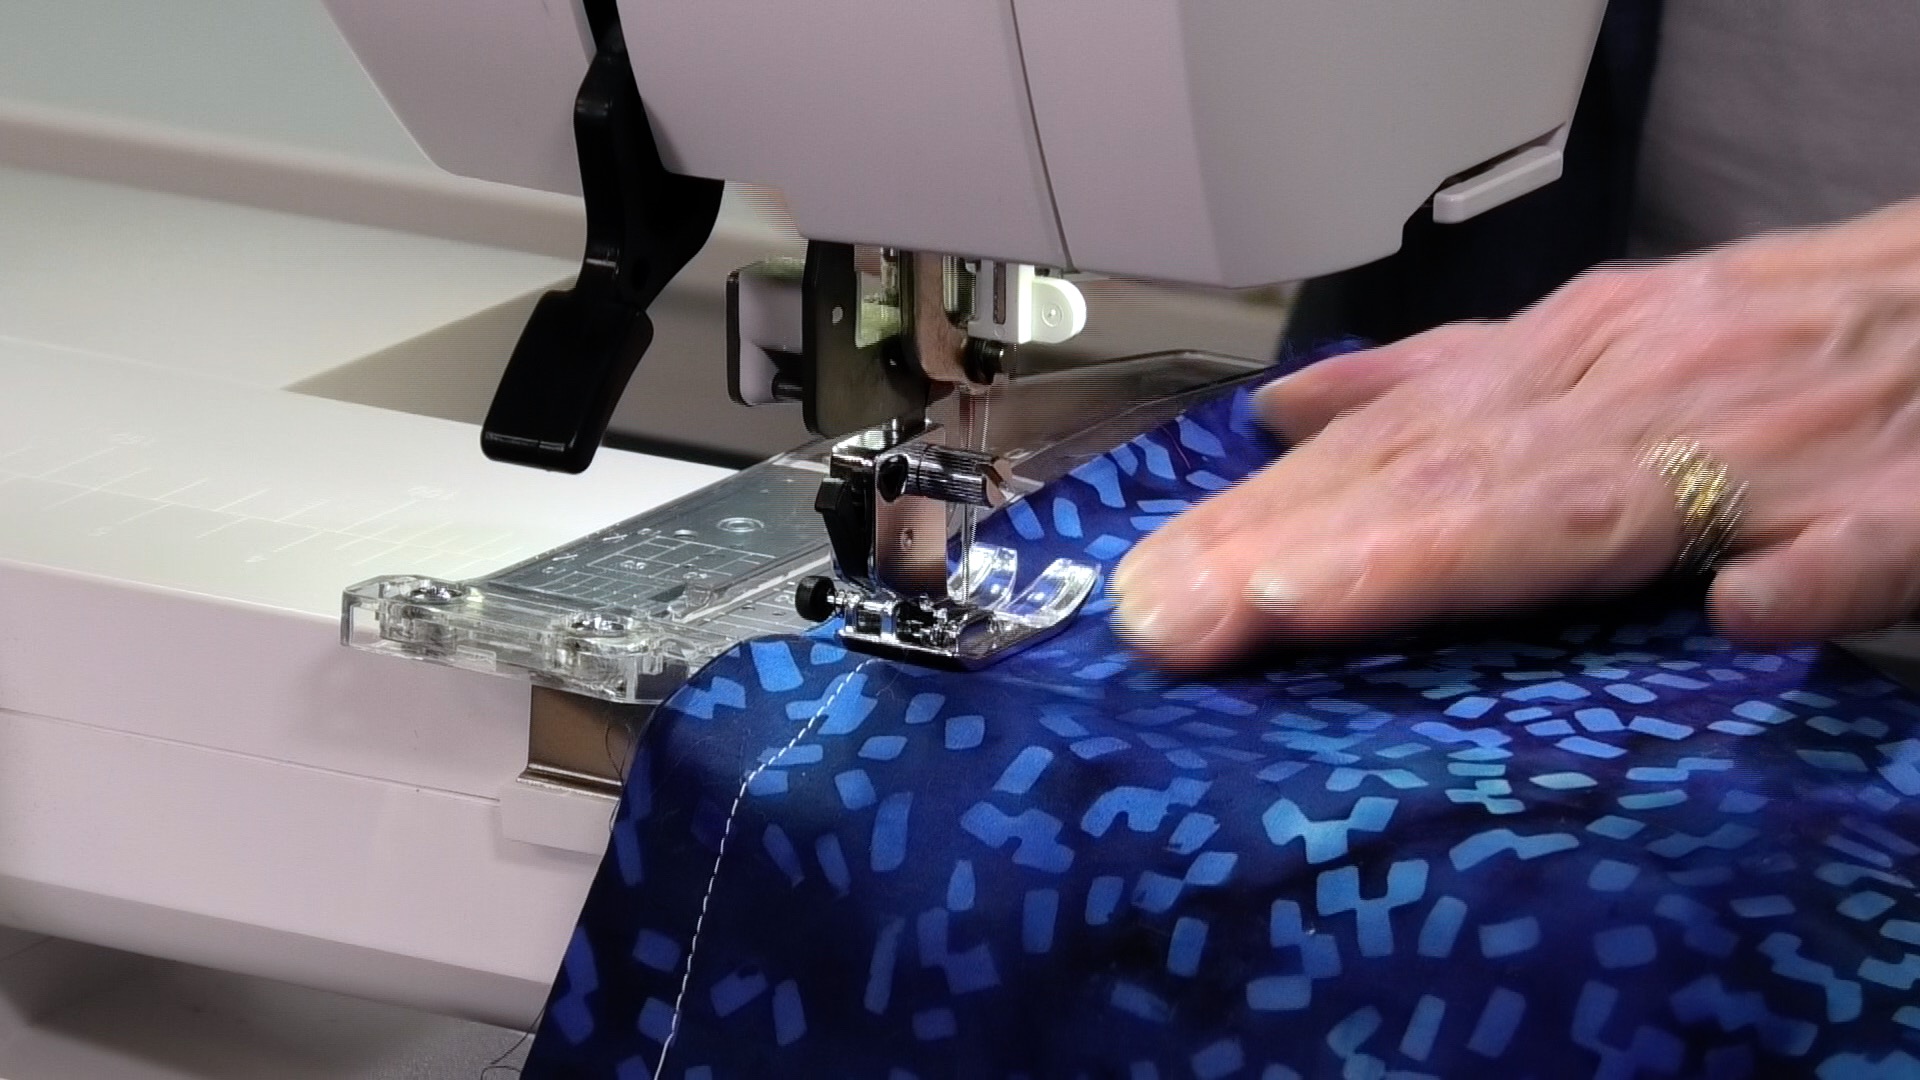
Another way that I think the cloth guide would be really helpful would be when you want to stitch several rows of decorative stitches a specific distance from the hem or cuff of a garment. You could use the cloth guide to stitch the first line of decorative stitches and then adjust it to where you want the subsequent stitching to be. Information on how to attach and use the cloth guide can be found on page 26 in your Janome MC9400 manual.
Click on the photo below to watch a video showing you how to attach and use the cloth guide.

Creatively,

BIG ANNOUNCEMENT: Enrolment in The Quilter's Way is now open. If you want the solution to your quilting problems and become the best quilter you can be, you need to be a member! Join here.
P.S. Did you know that you can sign up to receive emails full of FREE quilting goodness? Click here to receive FREE content directly in your email inbox every few weeks from Chatterbox Quilts. I know you'll be glad you did!

Welcome! I’m Kim Jamieson-Hirst of Chatterbox Quilts, a YouTube creator and host of The Quilter’s Way. I believe that quilting is more than just a 1/4” seam and that practice makes improvement and you are improving every day!
Contact me at kjh@chatterboxquilts.com.


Want to improve your quilting and have fun doing it? Join The Quilter's Way, a private online membership site that creates successful quilters.

Check out my favourite books and tools.
As an Amazon Associate I earn from qualifying purchases from links that you may find on the Chatterbox Quilts’ website.