
CHATTERBOX QUILTS’ BLOG
Helping Quilters Learn and Improve

Quick Snowball Block Variation #1
This might be the simplest quick quilt block that there is and it makes for a really quick and easy quilt project. Some people call this flipped corners block, but I know it as the Snowball block. To make this block you will need:
- 1 background square
- 4 smaller corner squares
Welcome to another Telecast Thursday! This week you'll learn how to make another really simple block. This might be the simplest quick quilt block that there is and it makes for a really quick and easy quilt project.
Some people call this flipped corners block, but I know it as the Snowball block. I prefer to create it when the weather is warmer as it just makes me feel cold when I think I'm making a Snowball block:)
To make this block you will need:
- 1 background square
- 4 smaller corner squares
In my example, I'm using a 6" background square and 4 - 2½" squares for the corners.
Be sure to use contrasting fabrics for the corner squares to get the desired effect.
Using a removable marker (Frixion pen in my case), draw a diagonal line on the back of the 4 - 2½" squares. You'll be placing these on each of the 4 corners of the background square and stitching along the drawn diagonal lines.
After stitching on all the diagonal lines, trim off the excess fabric that is underneath and press the corner squares out to the corner of the background square.
Congrats! You've made one Snowball block.
To see how I make a Snowball block and get extra half-square triangle units, click on the image below.

Have you made Snowball blocks before? What is your favourite way to use these easy-to-make blocks? Leave me a comment below or on my YouTube channel to let me know.
Creatively,

P.S. Join me in the private Chatterbox Quilts Facebook group. It's where we discuss quilting topics and drool over vintage sewing machines :)

Book Review - Free-Motion Machine Quilting 1-2-3
I love free motion quilting and am always looking for a good book to add to my quilting library all about this topic. I've found one in Free-Motion Machine Quilting 1-2-3 by Lori Kennedy.
You may already follow Lori's blog, The Inbox Jaunt, where she shares information and free motion quilting designs. (If you aren't familiar with her blog, you should check it out). In Free-Motion Machine Quilting 1-2-3 Lori shares many of her free motion designs and provides lots of information on free motion quilting.
One of my favourite things about this book, other than the amazing content, is that the book is ring bound. This allows you to lay the book out next to your sewing machine and use it as reference as you stitch out one of the over 60 designs in the book. Very handy!
The book is divided into sections based on the shapes of the designs, making it easy to find a swirl-type design or one that uses another shape, such as a leaf. Due to the type of information in the book, you would expect, and hope for, lots of reference photos - and this book has those. Lori stitches out her designs on solid colour fabrics so it is easy to see the design details.
Watch the video below or on my YouTube channel to see more about Free-Motion Machine Quilting 1-2-3.

If you want a good reference book on free motion quilting, you will want to get your own copy of Free-Motion Machine Quilting 1-2-3.
Do you love to do free motion quilting too? Leave me a comment below as to your favourite type of free motion design.
Creatively,

P.S. Join me in my private Chatterbox Quilts Facebook group for discussions on vintage sewing machines and quilting information. I'd love to chat with you there.
Disclaimer: I am an Amazon affiliate and will receive a small amount of compensation if you purchase by clicking through a link in this blog post. Thank you for allowing me to continue to create free content for you.

Vintage Sewing Machines and the Multi-Purpose Quilt Spray
We also use pins when basting our quilt sandwich together, although these are quilting pins and not straight pins. They can still pop open and cause damage or you might be trying to open one up as you are quilting along and accidentally catch it on the bed of the vintage sewing machine. There’s a way to avoid this type of damage to your machine when you are quilting: use the Multi-Purpose Quilt Spray, rather than quilting pins! Get rid of your quilting pins and use this spray to baste your quilt sandwich.
Have you ever noticed those scratches on the bed of your vintage sewing machines and wondered how they got there?
There are any number of reasons about how the machine bed got scratched, but I think that the majority of the time, the damage can be attributed to pins.
These older machines were mostly used for practical sewing and you know that straight pins are an essential part of that type of stitching.
Adding a collar to a shirt? Got to have pins to hold those pieces together as you stitch.
Easing in a full sleeve? Where are those pins?
Unfortunately, straight pins have a tendency to pop out of the fabric sometimes and jam on the sewing machine bed – if not in your fingers! Before you realize it, they’ve damaged the finish on your bed.
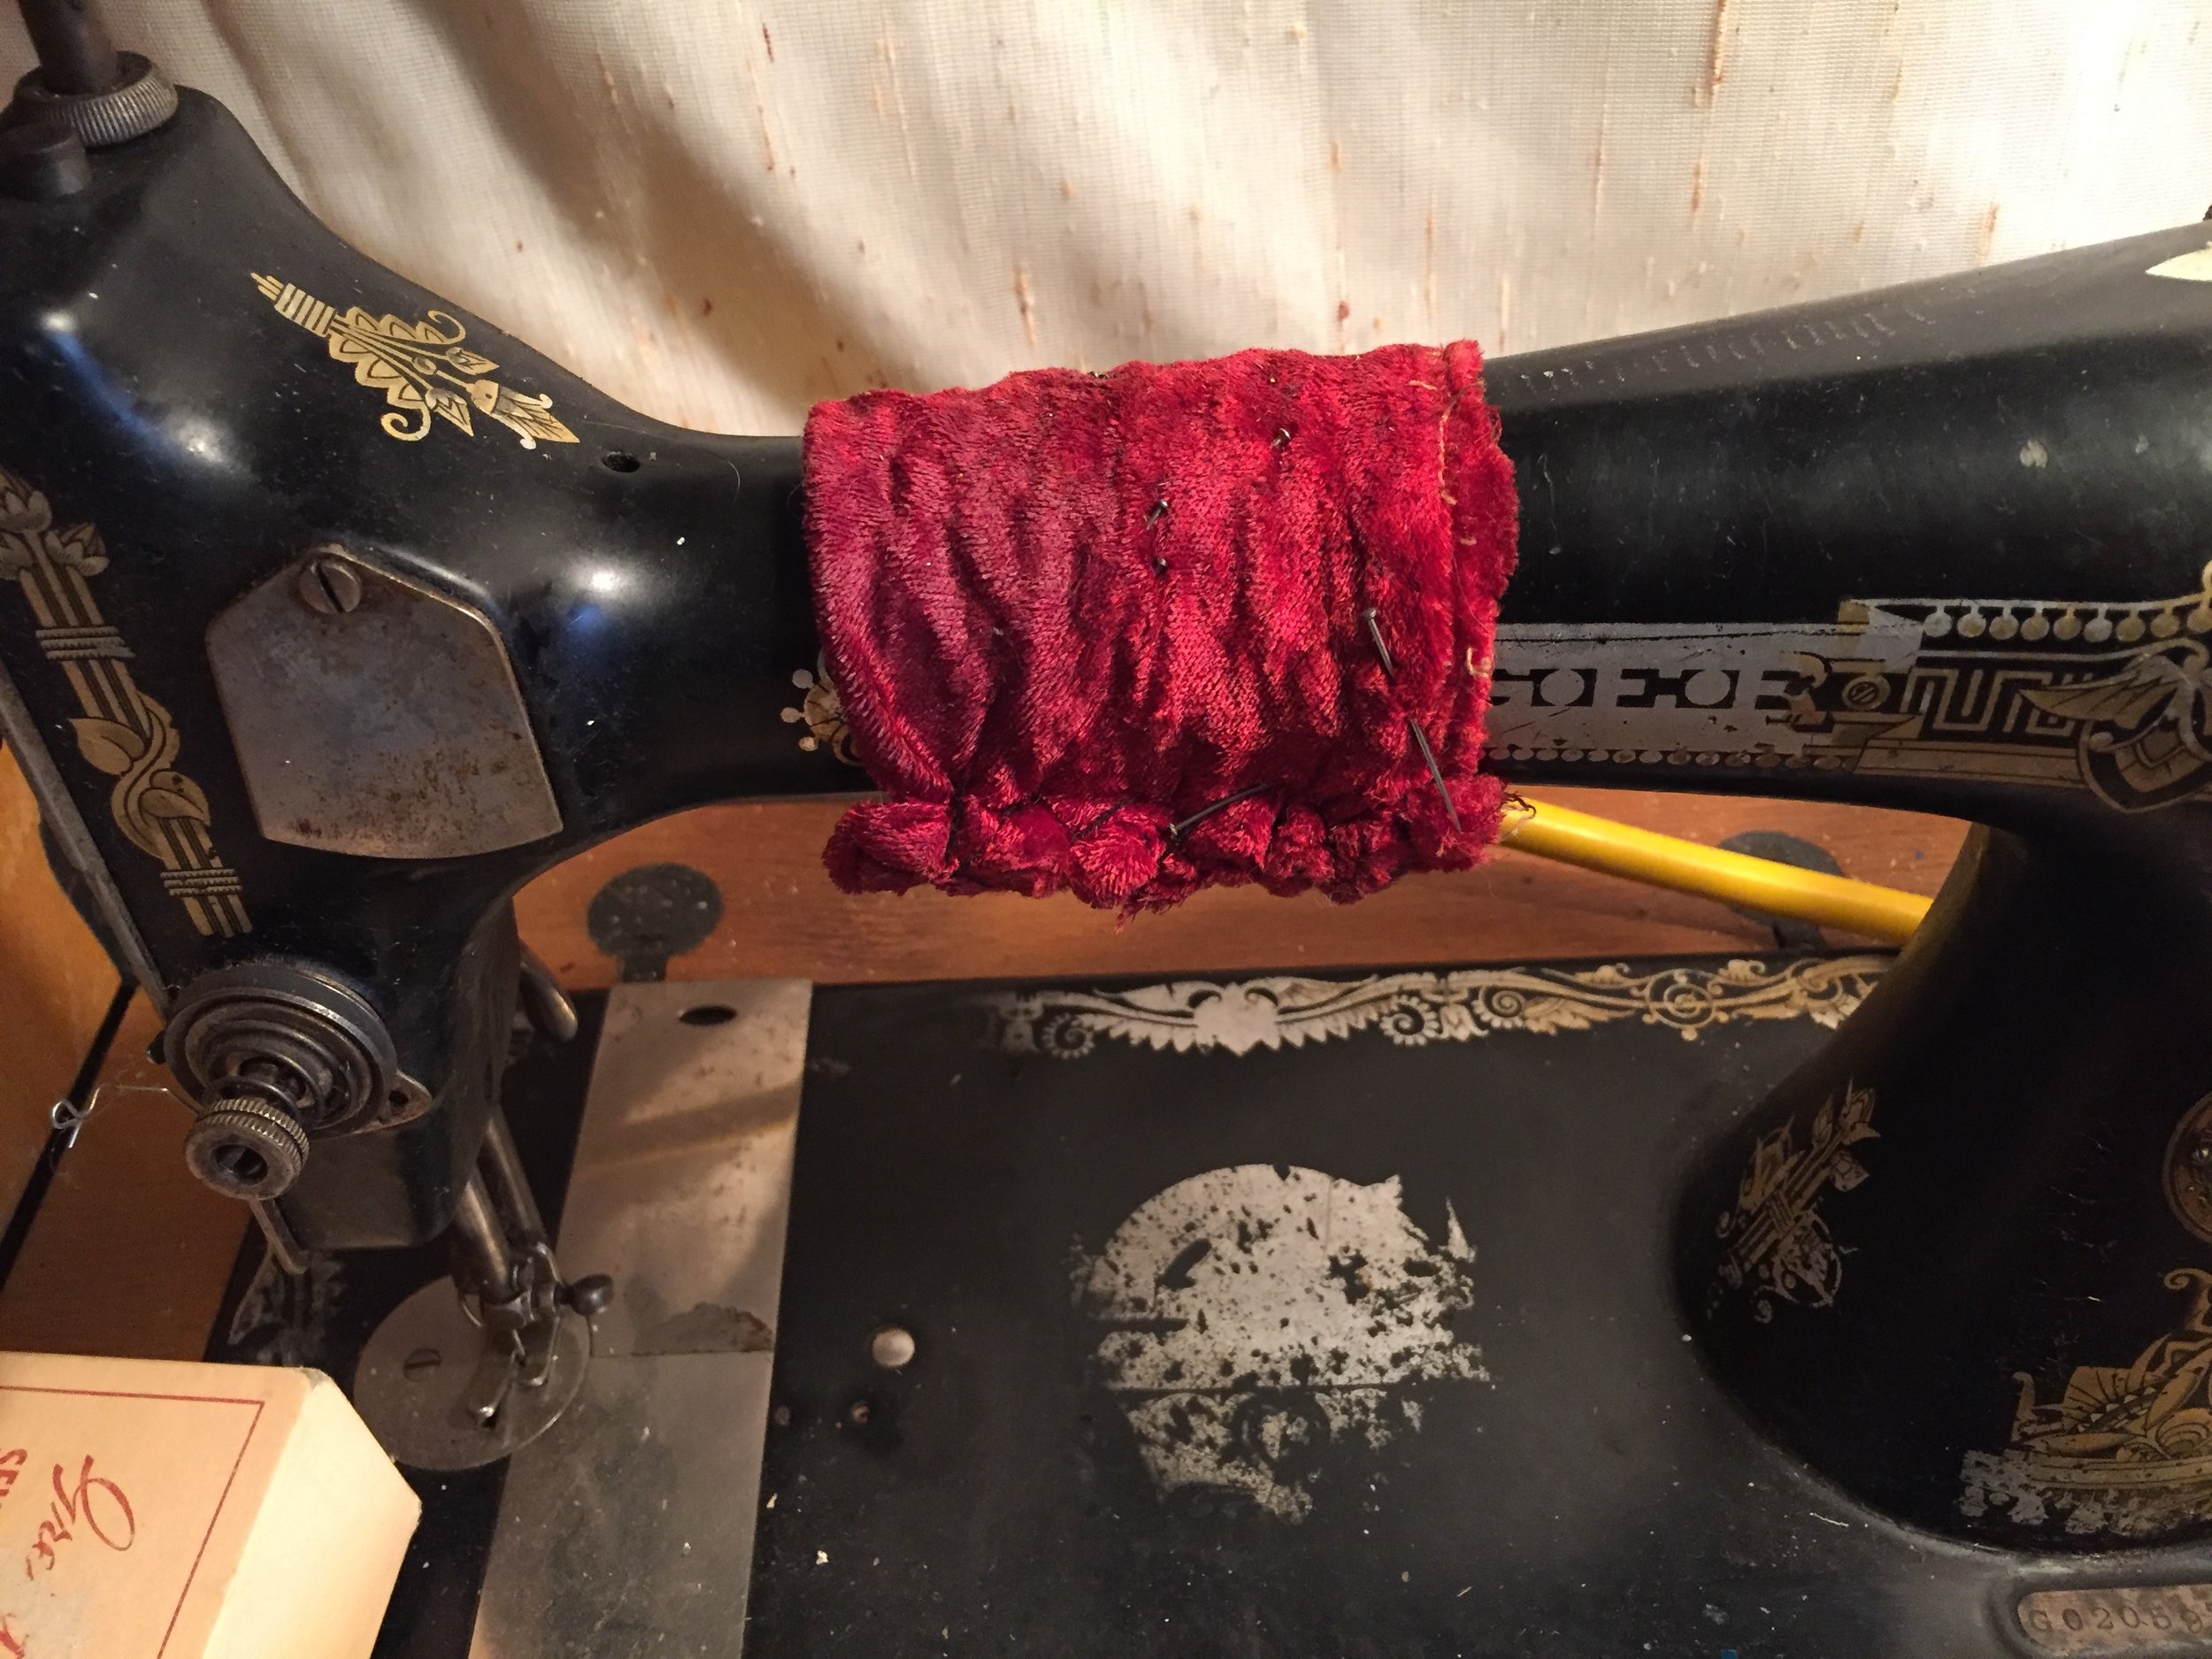
Old-fashioned "pin cushions" could cause scratches to the machine
We also use pins when basting our quilt sandwich together, although these are quilting pins and not straight pins. They can still pop open and cause damage or you might be trying to open one up as you are quilting along and accidentally catch it on the bed of the vintage sewing machine. There’s a way to avoid this type of damage to your machine when you are quilting: use the Multi-Purpose Quilt Spray, rather than quilting pins! Get rid of your quilting pins and use this spray to baste your quilt sandwich.
If you haven’t already read the previous blogposts about this Multi-Purpose Quilt Spray and its uses, I’ve gathered all the information into one blogpost that you can read here.
Using it when quilting on your vintage sewing machine prevents the addition of more scratches to the machine bed. It also allows you to quilt without having to stop to remove quilting pins. A double win!

Try the Multi-Purpose Quilt Spray when quilting on your modern, or vintage, sewing machine. It's FREE and you can print it out so you'll have all the information you need to make your own batch of it.
If you are thinking of buying a vintage sewing machine you may be interested in my eBooks for buyers (click here). If you are thinking of selling your machine you may be interested in my How To Sell a Vintage Sewing Machine eBook.
Please share this information with your friends by clicking on the "Share" icon below
If you have any questions or comments about this spray, please leave them in the Comments below.
Creatively,

P.S. Join the private Chatterbox Quilts Facebook group for quilting and vintage sewing machine information.
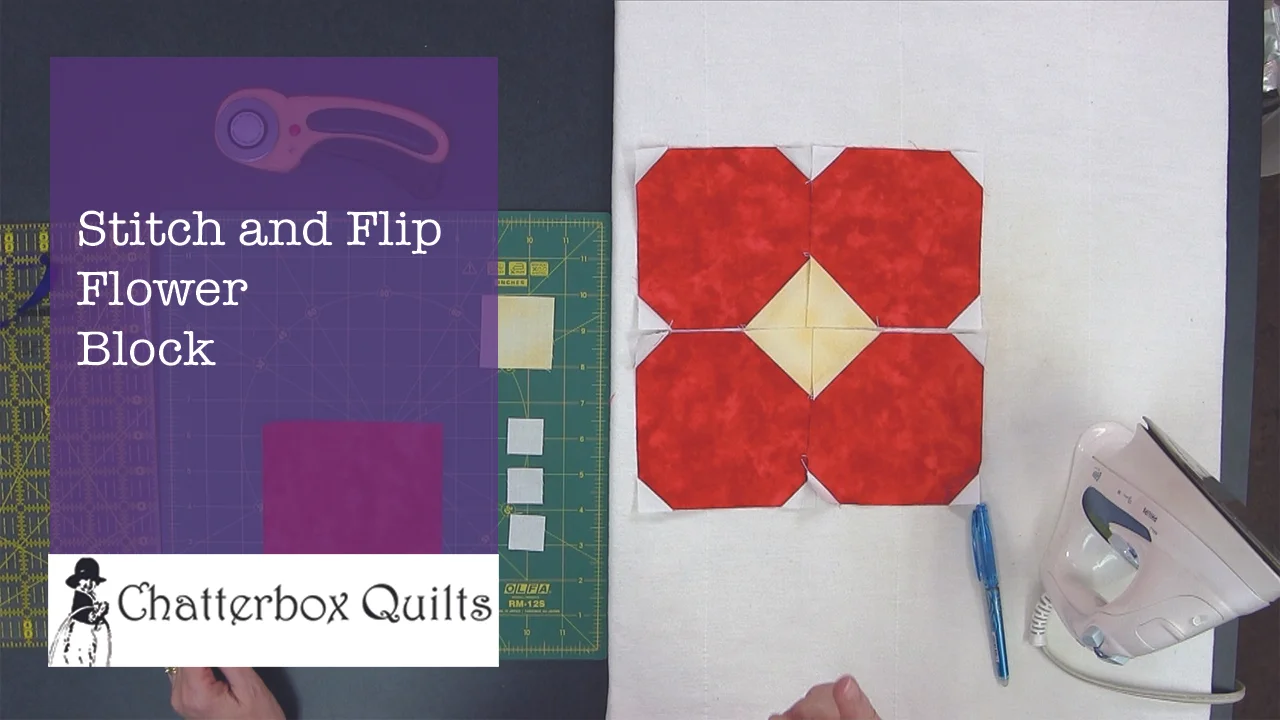
Stitch and Flip Flower Block
The Stitch and Flip Flower block is created from four Stitch and Flip blocks. The key is the fabric placement. To make each block you'll need:
1 - 5" square (this will form the petal)
3 - 1" white or light coloured squares (this will form the background of the petal)
1 - 2" yellow square (to form the flower centre)
Now that things are finally warming up in Calgary - I thought the winter would never end - I think it's the perfect time to create some flowers in our quilts. Today's Telecast Thursday is all about creating a pieced flower from a Stitch and Flip block.
If you haven't watched all of the videos about creating this type of quick quilt block, you can find them all grouped into a playlist for easier location.
The Stitch and Flip Flower block is created from four Stitch and Flip blocks. The key is the fabric placement. To make each block you'll need:
1 - 5" square (this will form the petal)
3 - 1" white or light coloured squares (this will form the background of the petal)
1 - 2" yellow square (to form the flower centre)
It's important to ensure that there is a contrast between the petal fabric and the background fabric to create the proper effect. While I've used yellow fabric for the flower centre, you could use other colours, just be sure they contrast with the petal fabric.
Draw a diagonal line on the back of all of the smaller squares (1" and 2" ones). Place the yellow square on one corner, right sides together, of the 5" square (the petal fabric). Stitch along the diagonal line or just a teeny bit off towards the corner. Press the yellow fabric towards the corner and then trim off the underneath fabrics. Repeat this process for the remaining 3 - 1" squares.
To make the flower itself, you'll need to make three more of these units.
Refer to the video below on or my YouTube channel to see how to arrange the four blocks to create one lovely flower.

Subscribe to my YouTube channel to receive automatic notifications when new videos are posted.
While my flower looks like a poppy due to my choice of the red colour, you could certainly change up the petal fabric to create the look of other flowers. Morning glories, anyone?
Please share this information with your quilting friends. You can do this by clicking on the "Share" icon below and send out this blog post via your favourite social media site.
I'd love to hear your suggestions for how you could use these blocks in a quilt setting. Would you just use the same colour for the petals or would you mix them up with wild colours? Let me know your ideas in the comments below.
Creatively,

P.S. Please join my private Chatterbox Quilts' Facebook group for information and discussions on quilting topics. I'd love to chat with you there!

Essential Oils in the Multi-Purpose Quilt Spray
The Multi-Purpose Quilt Spray has quite a strong medicinal odour and it would be great if something could be added to it to change it to a more pleasant smell. I’m not a parfumière, but my first thought was to add essential oil to the spray. So I did. I added several drops of lavender oil to the already made spray and let it sit for several days.
I recently received a comment on my YouTube video about the Multi-Purpose Quilt Spray that you can make yourself. (If you haven’t seen the previous videos on this amazing and easy to make spray, you can find them here).
The comment was:
"Have you or anyone else ever considered adding some type of fragrance? If so, I'm wondering what would work best.” From JB
The Multi-Purpose Quilt Spray has quite a strong medicinal odour and it would be great if something could be added to it to change it to a more pleasant smell. I’m not a parfumière, but my first thought was to add essential oil to the spray. So I did. I added several drops of lavender oil to the already made spray and let it sit for several days.
In addition to changing the smell to something more agreeable, I wanted to be sure that the spray would not leave an oily mark on my fabric. I sprayed some dark batik and then sandwiched it, just as I would for a quilt. And then I left it to dry overnight.

Sample sandwiches for testing
Here’s what I found:
1. The essential oil didn't dramatically change the smell of the spray
2. The spray did/didn’t leave a mark on any of the fabrics

Teeka, the sample inspector
I found that I had to add more lavender oil to the spray than I would’ve thought to change the smell of it at all. Unfortunately, I couldn't ever completely erase the medicine-y smell of the Multi-Purpose Quilt Spray, even with lots of lavender oil drops. The good news is that the added oil did not stain any of the quilt sandwich samples.

Get the FREE Multi-Purpose Quilt Spray printable download so you can create your own quilt spray.
If you have any suggestions as to a method of improving the smell of the Multi-Purpose Quilt Spray, please leave them in the Comments below.
Creatively,

P.S. Join the private Chatterbox Quilts Facebook group for quilting and vintage sewing machine information. I'd love to have you join us :)

Welcome! I’m Kim Jamieson-Hirst of Chatterbox Quilts, a YouTube creator and host of The Quilter’s Way. I believe that quilting is more than just a 1/4” seam and that practice makes improvement and you are improving every day!
Contact me at kjh@chatterboxquilts.com.


Want to improve your quilting and have fun doing it? Join The Quilter's Way, a private online membership site that creates successful quilters.

Check out my favourite books and tools.
As an Amazon Associate I earn from qualifying purchases from links that you may find on the Chatterbox Quilts’ website.