
CHATTERBOX QUILTS’ BLOG
Helping Quilters Learn and Improve

Squaring Up Fabric with Rulers
It's another Telecast Thursday and this week I'm addressing a question that I've heard many times: how to I cut my fabric? Do I use the lines on my ruler? Do I use the lines on the cutting mat?
There are many ways to cut your fabric, but you always want to start your cutting with a straight edge, so the most important part of cutting your fabric is how to straighten your edge so the rest of your cuts will be straight.
I use the lines on my ruler to straighten up my fabric edge and I'll show you that in the video below, but before I can start cutting, I want to be sure that my fabric is folded evenly. if the fabric is askew, so will be the cuts!
Watch the video below to see my technique or view it on my YouTube channel.

There are many ways to straighten your fabric edge, but this is the method that works best for me.
How do you straighten the edge of your fabric? Leave me a Comment below to describe your technique.
Creatively,

P.S. I invite you to join my private Chatterbox Quilts' Facebook group. This encouraging group is the place to learn and share with other quilters.

Slice and Insert Quilt Block
Happy Telecast Thursday! This week I'm going to show you how to make another quick quilt block, but this one doesn't use the stitch and flip method. I know! Such a departure!
Rather than stitching and flipping, we are going to be slicing and inserting this week. This Slice and Insert quilt block has a real improvisational feel to it and since there are no lines to follow when slicing, you are completely free to do your own thing with it.
You'll need 3 fabrics to make this block:
1 background fabric
2 contrasting fabric strips at least 1 1/2" wide
To make this block work, you need to be sure that there is a strong contrast between the background fabric and the two fabric strips. I've chosen a black and white print for the background fabric and two solid colour fabrics (red and blue) for the strips. By choosing the solid colour fabrics, I've created a modern looking block.
This is a perfect quilt to use pre-cuts: a layer cake piece for the background and jelly roll strips for the inserted strips.
You'll be slicing the background block on a diagonal, but not corner to corner. You'll then add the first fabric strip and I've shown you a handy way to get everything lined up properly that I learned from Jacquie Gering.
The technique is easier to understand by watching the video below or on my YouTube channel to see how this block comes together.

This Slice and Insert block is a good way to use up excess fabric strips, perhaps those left over from binding pieces.
This will be the last Quick Quilt Block in the series - for now. You can find all of the other Quick Quilt Blocks in the playlist on my YouTube channel.
What has been your favourite Quick Quilt Block in this series? Do you have other blocks that you consider quick to make? Let me know in the Comments below.
Creatively,

P.S. I'd love to have you join me and hundreds of other quilters in the private Chatterbox Quilts' Facebook group. Learn and share with other quilters in this encouraging group.

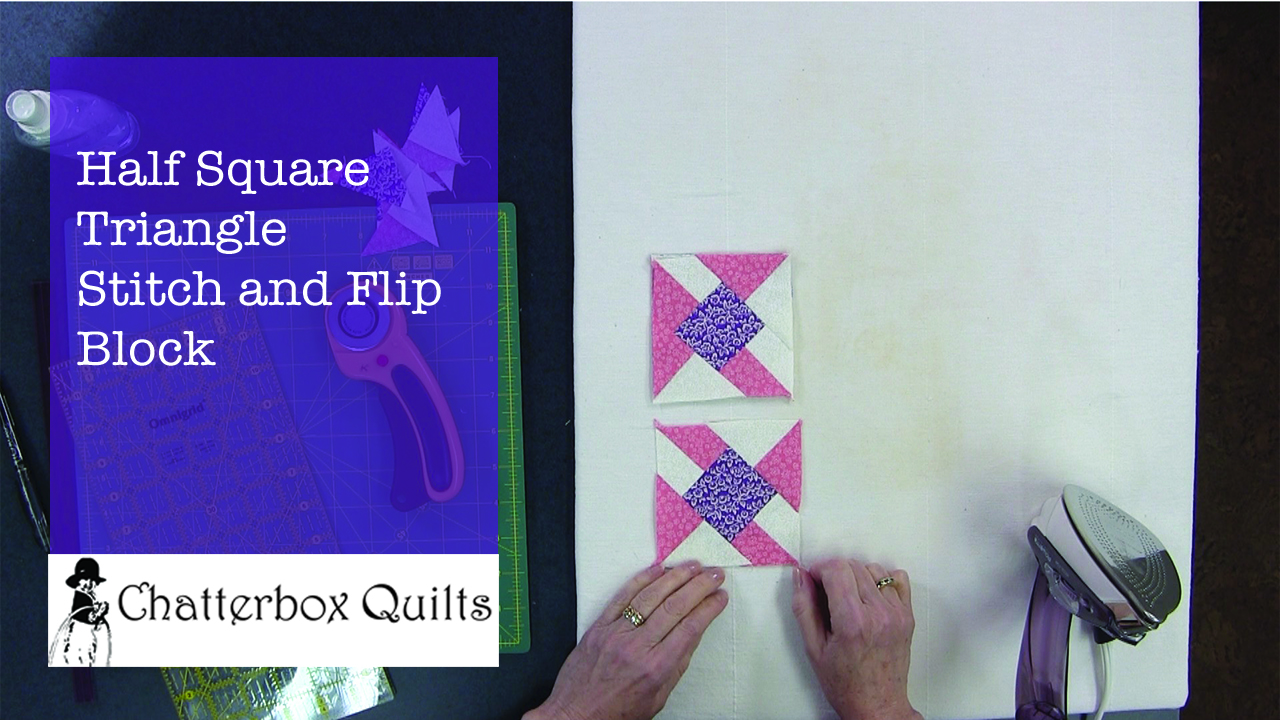
Half Square Triangle Stitch and Flip Block
I'm going to show you how to create a Half Square Triangle Stitch and Flip block. Yes, it's a mouthful, and while it's hard to say, it's quite easy to make. You'll need:
a background square
4 half square triangles
I've got another quick stitch and flip block for you this week. This one looks quite complicated, but it's really very easy to create.
This week I'm going to show you how to make a Half Square Triangle Stitch and Flip block. Yes, it's a mouthful, and while it's hard to say, it's quite easy to make :)
You'll need:
a background square
4 half square triangles
I've shown you several ways to make half square triangles in previous videos, so refer to my Quick Quilt Blocks playlist to choose your favourite method and make four of them.
The background square that I use in my example is 4" and the half square triangles are 2½" unfinished.
You'll need to draw a diagonal line on the wrong side of each of the half square triangle units using a removable pen or pencil. This line will go across the stitched seam.
Next you will place a half square triangle onto one of the background square's corners. You can play around with the arrangement, but be sure that the drawn line, where you will be stitching, is oriented properly on the background square.
Stitch on the drawn diagonal line on one of the half square triangles and then press it out to the background square's corner before proceeding to add the next half square triangle to the background square. You could stitch half square triangles to the opposite corners of the background square if you wish, but don't do adjacent corners. Trim up the excess corner fabric and square up the block.
Click on the image below to watch the video to see exactly how this process goes.
I like how this block looks complicated, but is really quite simple to make. Which version is your favourite? Leave me a comment below to let me know.
Creatively,

I'd like to invite you to join me in my private Chatterbox Quilts Facebook group. It's where we share quilting and vintage sewing machine information. It's a friendly group which I'm sure you'll enjoy. Hope to see you there :)

Improvisational Stitch and Flip Block
I'm going to show you how to make an Improvisational Stitch and Flip block - or as I call it "the drunken version" of the Uneven Stitch and Flip block". You'll soon see why. To start you will need:
- 1 background block (I used a 4" square)
- 4 pieces of fabric
Another Telecast Thursday has arrived! And another stitch and flip quick quilt block has joined it!
This week I'm going to show you how to make an Improvisational Stitch and Flip block - or as I call it "the drunken version" of the Uneven Stitch and Flip block". You'll soon see why.
To start you will need:
- 1 background block (I used a 4" square)
- 4 pieces of fabric
You have probably noticed that I didn't say "4 corner squares" as I usually do. This is because you don't actually have to use squares on the corners of the background square. Remember, this is an improvisational method, so you can just use a piece of fabric, but there is a condition: it must be large enough to go all the way across the background square at the corner and extend out over the edge of the background square when you "flip" it by at least 1/4". It's easier to understand what I mean by clicking on the image below to watch the technique video.

One important note about this method: you need to press the corner fabric out to the background square corner before adding fabric on another corner. You will also have to trim off the extra corner fabric before moving on to the next step.
Did you notice that you don't need to mark a diagonal line on the back of the corner pieces of fabric? This is truly an improvisational method :) It's also a great way to use up scrap fabric and who doesn't have scraps that they want to include in a quilt?!
Keeping with the unplanned method of making this block, you don't have to add fabric on every corner of the background square. Experiment with adding fabric on diagonal corners of the background square, or on adjacent corners or maybe just on one corner. You can play around a lot with this block, so have fun with it!
Do you see why I call it a "drunken version" of the Uneven Stitch and Flip block? It definitely has an unplanned, wonky look to it!
Truth: I am not really an improvisational type of gal and have a really hard time using this kind of a technique, but I'm working on it. I'm curious: leave me a Comment below or on my YouTube channel to tell me if you are comfortable with improvisational quilting, and if so, if you have any tips to make it easier for me.
Creatively,

P.S. I hope you'll join me in my private Chatterbox Quilts Facebook group for more quilting information and chats. The group loves to help each other and share information. I look forward to seeing you there :)

Binding with the Multi-Purpose Quilt Spray
As more people have used this spray, I've been receiving questions about other ways that it can be used. I've found another fantastic use for it: binding. Okay, you will still have to stitch the binding down, but you can use the Multi-Purpose Quilt Spray to hold the binding in place so it is much easier for you to stitch. No more pins or clips required!
I'm starting off this post with a question: have you read my previous blogposts about the Multi-Purpose Quilt Spray? If the answer is no, I've provided a link so you can read all about the many things you can do with this spray and download a FREE printable so you can make and use your own Multi-Purpose Quilt Spray.
I've had so many of my subscribers tell me how much they enjoy using this spray and saving money at the same time. More money in your pocket is always a good thing, no?! If you haven't tried it yet, please download the FREE information and try it.
As more people have used this spray, I've been receiving questions about other ways that it can be used. I've found another fantastic use for it: binding. Okay, you will still have to stitch the binding down, but you can use the Multi-Purpose Quilt Spray to hold the binding in place so it is much easier for you to stitch. No more pins or clips required!
To learn more about other similar uses for the Multi-Purpose Quilt Spray, please watch the video below or on my Youtube channel.

I can't believe that I didn't think of this use for the Multi-Purpose Quilt Spray sooner - it's so obvious and so helpful!
If you've used the Multi-Purpose Quilt Spray, please leave a comment below to let me know how you liked it and what you are using it for. I'd love to hear what you think.
Creatively,

P.S. Join the private Chatterbox Quilts Facebook group for information about helpful quilting tips and techniques with a sprinkling of vintage sewing machine discussion thrown in. :)

Welcome! I’m Kim Jamieson-Hirst of Chatterbox Quilts, a YouTube creator and host of The Quilter’s Way. I believe that quilting is more than just a 1/4” seam and that practice makes improvement and you are improving every day!
Contact me at kjh@chatterboxquilts.com.


Want to improve your quilting and have fun doing it? Join The Quilter's Way, a private online membership site that creates successful quilters.

Check out my favourite books and tools.
As an Amazon Associate I earn from qualifying purchases from links that you may find on the Chatterbox Quilts’ website.