
CHATTERBOX QUILTS’ BLOG
Helping Quilters Learn and Improve
QuiltFusion - The Future of Quilt Design?
Recently, while browsing the internet, I discovered a piece of software, called Quilt Fusion, which has the potential to remove constraints to your creativity by turning the process of quilt design on its head.

Quilt Fusion allows me to create a fusible web appliqué project from a library of fabrics and appliqué designs and then, with a push of a button, produces a fully developed pattern complete with full-size appliqué templates, appliqué placement guide, fabric quantities, and step-by-step instructions all customized for my design. The pattern shows exactly what the quilt is going to look like once it is created and I can even order a kit customized for my quilt design with a press of a button. In addition, you can download svg files of the individual appliqué pieces to use on an electronic cutter. Was I impressed? – you bet.

Photo courtesy of www.quiltfusion.com
Quilt Fusion is a free iPad app with a monthly subscription required to print out your quilt finished pattern (annual subscriptions may be available in the future). The software allows you to create fusible web appliqué quilts from a series of templates and shapes from a library that comes with the app. It is very intuitive to use and you can have a quilt design complete with instructions completed in no time. Once your design is complete you submit it and your pattern is emailed to you in pdf format. You can elect to share your design in the Quilt Gallery where other subscribers can download your pattern, or customize (edit) it to create their own design. If you want you can order a kit from Batiks Plus who will send you a kit customized to your quilt design. Imagine going from idea, to quilt design, to pattern & instructions, to a kit using one simple piece of software. This is mind blowing.

Photo courtesy of www.quiltfusion.com
Now before I let my enthusiasm run away with me you should know that the software does have some limitations. At this time the software only offers templates for fusible web appliqué quilts and, since it is new, there are a limited number of appliqué designs to choose from in creating your pattern. The designer is committed to adding to the library of appliqué designs and to develop new features in the near future. In addition, your “freedom” to design will be somewhat restricted by what designs are available. While this may seem restrictive, I actually view it as helpful when creating your quilt design. There are definitely lots of designs to choose from and I believe that sometimes too many choices can be more restrictive than not enough of them. This "restriction" is a natural result of making the pattern creation process simple. The trade-off between simplicity and “freedom” is one that is often made when making a tool (or a piece of software) simple to use.

Photo courtesy of www.quiltfusion.com
As much fun as Quilt Fusion is, what really excites me is how this type of software has the potential to free the creativity of the quilter from the restrictions of traditional patterns. With Quilt Fusion everyone can become a quilt pattern designer (although you aren't able to sell your designs due to copyright on the appliqué designs). Just imagine the burst of creativity we are going to see in the quilting community as this type of software becomes more comprehensive. Think how satisfying it will be for quilters to conceive of an idea, assemble the design and then have it captured in a pattern. Quilt Fusion provides immediate feedback on what the quilt will look like based on their choices of fabric. For quilt designers this software may someday provide the opportunity to create a design that are flexible and will actively encourage the quilter to experiment.

Photo courtesy of www.quiltfusion.com
The state of this software feels very similar to the early days of page layout software, which initially allowed the average person to create simple written materials. Now that software has matured to a point that many people can now blog or self-publish books. I think that the quilt design world is on the cusp of a similar revolution and I can’t wait!
I know that you'll want to try Quilt Fusion, and they have generously offered a month's subscription to one of my blogpost readers. Just enter a comment below indicating your favourite design in the Quilt Fusion Quilt Gallery to be entered to win. You have until Friday, September 18, 2015 at 6:00 p.m. MST to enter. Good luck!
I hope you'll take a look at Quilt Fusion and let me know what you think. I'm sure you'll be as excited about it as I am.
Creatively,

Thread Tension on the Janome Horizon Memory Craft 8900 Sewing Machine
I recently had one of my Youtube viewers ask for help with the thread tension on her Janome Horizon Memory Craft 8900 QCP, one of the sewing machines I also own.

She was trying to sew a straight seam and her machine was skipping stitches. In case you may also have this problem with your machine, here are some suggestions (the instruction manual pages refer to this specific model of Janome sewing machine):
First, get out your sewing machine's instruction manual - you're going to need it!
You should always have your sewing machine's manual close at hand.
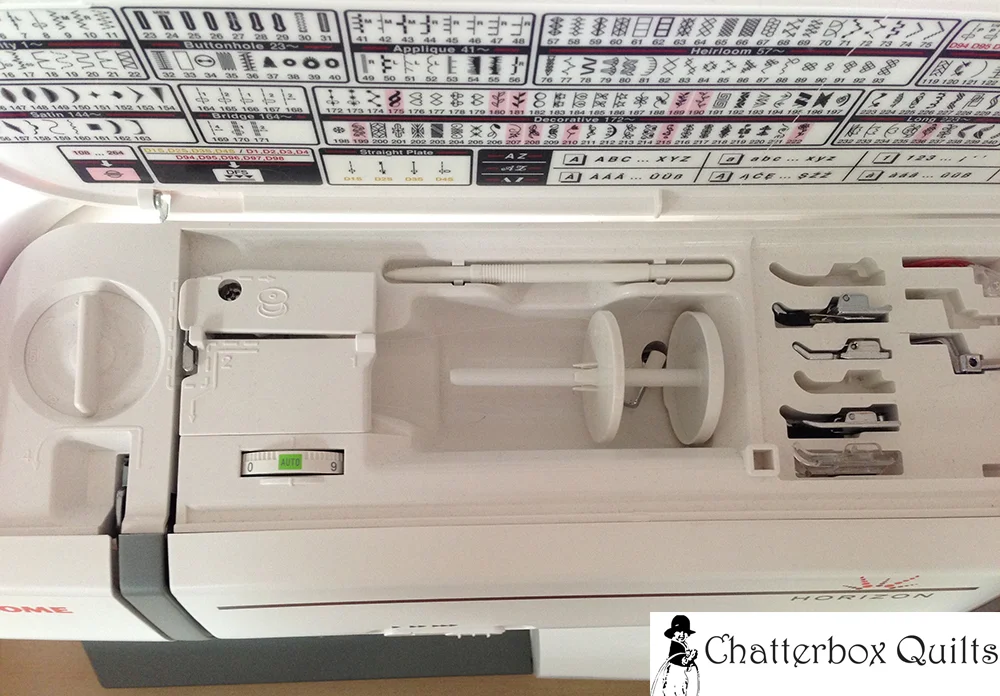
Let’s start at the beginning - winding the bobbin. The bobbin needs to be tightly wound as a loosely wound bobbin can cause problems. When winding the bobbin, ensure that you are running the machine at top speed - move the speed control slider over to the far right (see p. 8 in your manual). This will help to wind the bobbin tightly. Be sure that you are following the correct thread path when winding the bobbin (see p. 19 in your manual). You want to ensure that the thread stays in this thread path as you are winding the bobbin as sometimes it can slip out and this will result in uneven bobbin winding. If you’ve done this and are confident that the bobbin is wound tightly, …

Pretty blue Janome bobbins
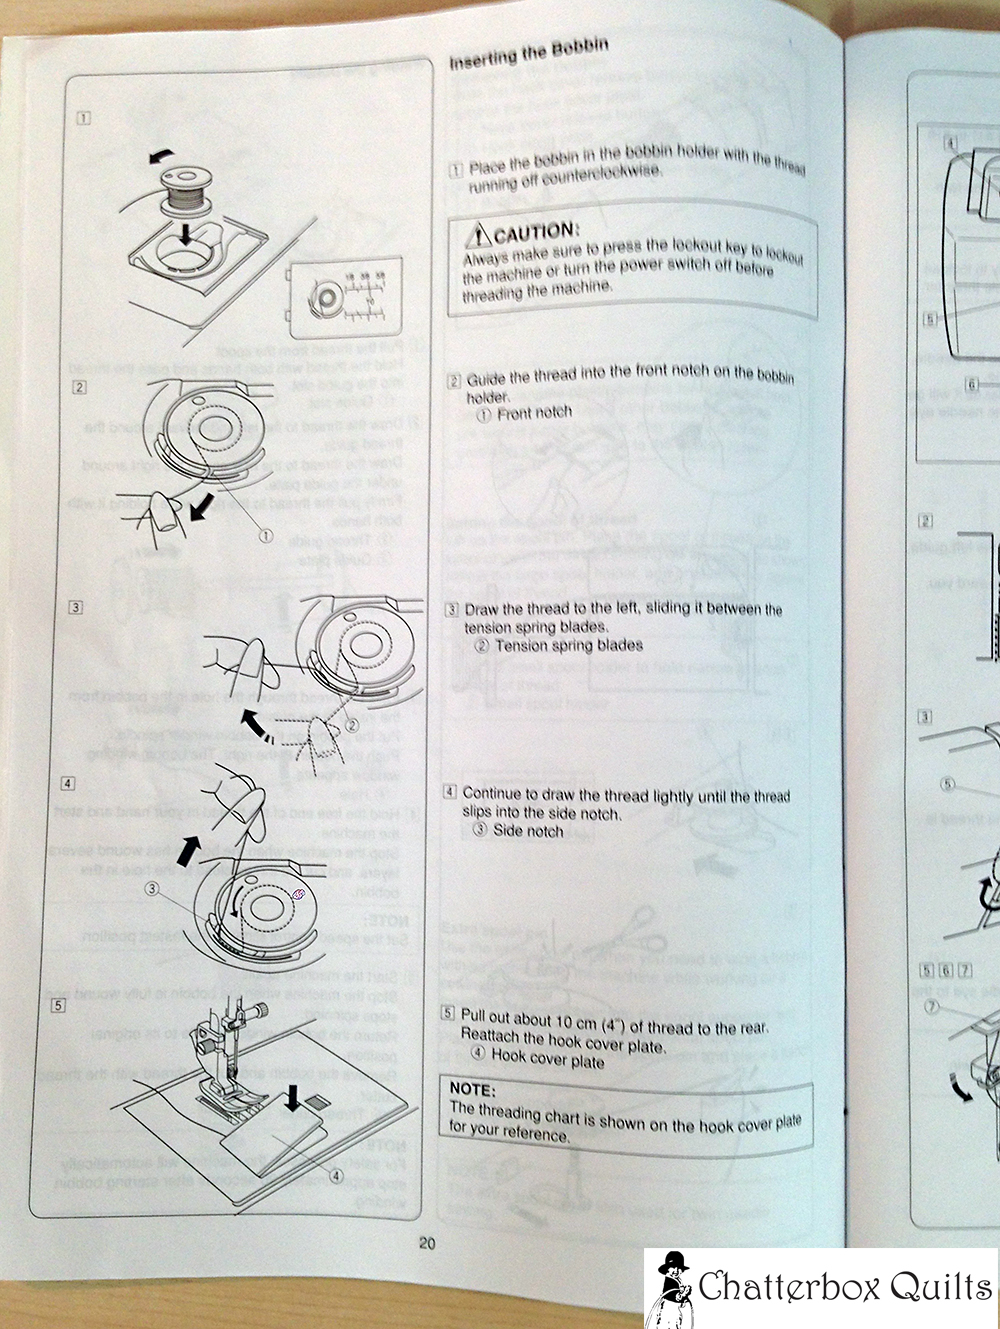
Check to ensure that you have put the bobbin in the machine correctly. For this model of the Janome, the bobbin should be inserted counterclockwise (see p. 20 in your manual).
Check your manual for the correct way to insert the bobbin.
I have several machines and always have to check this out as the bobbins in some machines go in one way and some the other, so just be sure that the bobbin is in the correct way for your specific sewing machine. For my model of Janome the thread fits into the front notch in the bobbin holder and goes to the left into the side notch. Again, if the thread isn’t catching in all these areas, this will cause tension problems.

Ensure that the bobbin is inserted correctly - the thread runs off counterclockwise for my Janome
I’m not sure if you’re using the same thread in the top of the machine as in the bobbin. If you are, the thread tension dial should be set to “Auto”. If you are using two different weights/types of thread, you may have to change the tension to either higher or lower (see page 12 in your manual).

Check and adjust your thread tension, if needed.
Next I would check to ensure that your top thread is correctly threaded. Again, it’s easy to miss one of these areas or the thread can sometimes pop out and this causes problems.

Do you know your sewing machine's thread path? If not, check your instruction manual.
Check page 21 in your manual to ensure that the top thread is correctly threaded. Remember to raise the presser foot when threading the machine and have the needle at the highest position. Threading the machine with the presser foot down can result in improper thread tension.
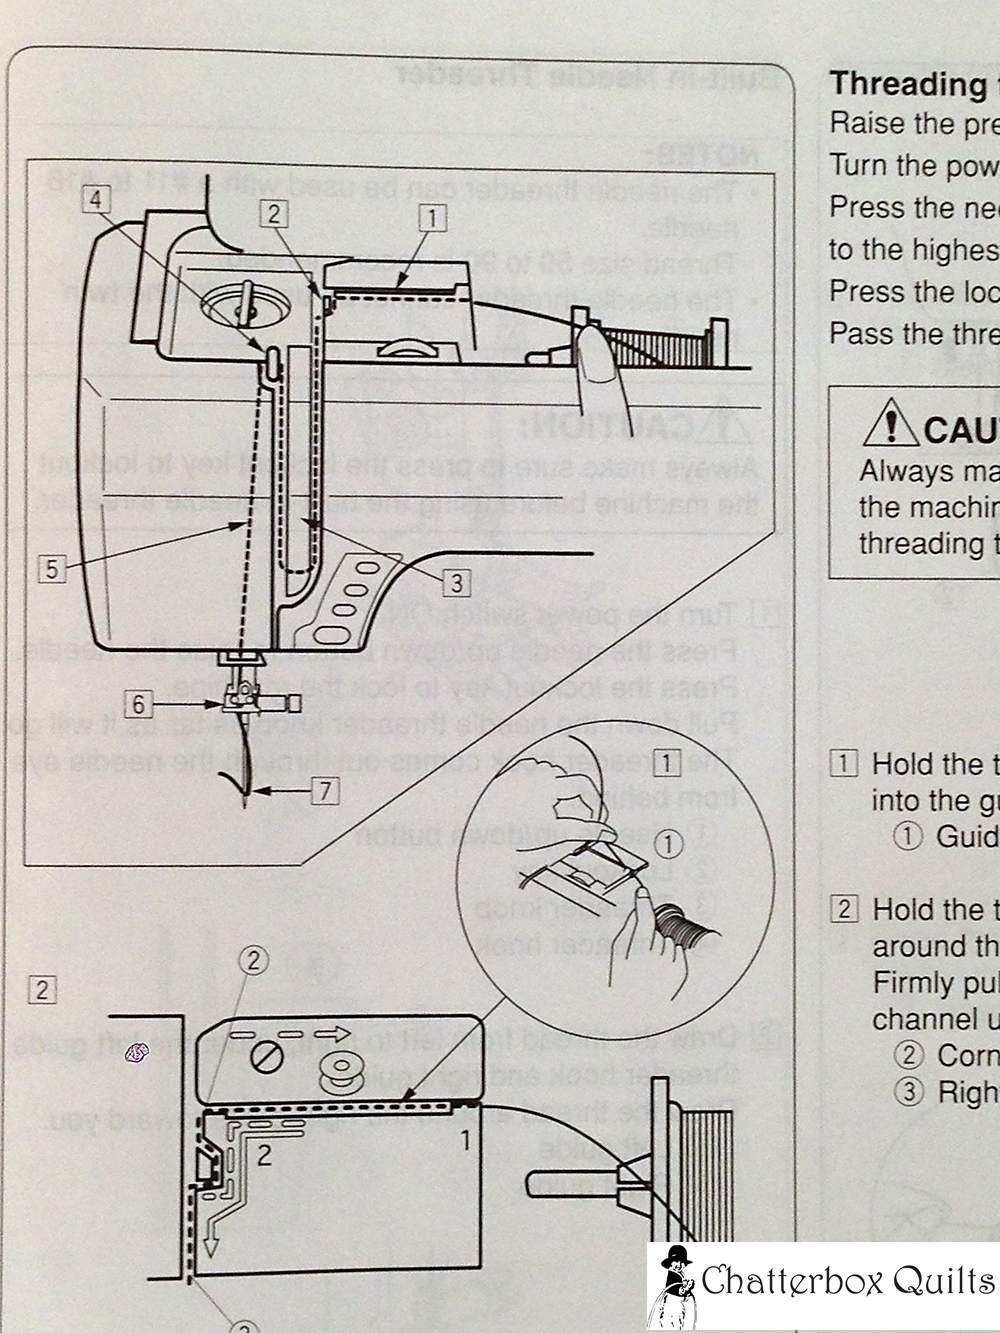
Check your instruction manual for the proper way to thread your sewing machine.
Changing the needle can sometimes help as well. Again, ensure that you are using the correct needle size for the thread you are using. I usually use an 80/12 or 90/14 in the machine and haven’t had any problems. You can check for the appropriate needle size on page 17 of your manual.
You can also try cleaning out the bobbin area to ensure that there isn’t any lint or stray threads that are causing the problem. See page 101 in your manual to see how to take out the bobbin case and clean the area. Take a good look at how the bobbin case is installed before removing it as it has to go back in a certain way to work properly. There is also a screw on the bobbin case that you’ll see when you take it out. If the thread is running out of the bobbin case too quickly, you may need to tighten the screw. If you can’t get it to come out at all, you may have to loosen it a bit. Check out this blogpost to see what I mean.

Take out the bobbin and clean the bobbin area after each project.
I hope that some of these steps help you with the thread tension. If you are still not able to get the tension the way you want it, I would suggest calling up your local Janome dealer and they should be happy to help you out.
Download the free Get Out of the Ditch! guide to learn how to start free motion quilting by clicking here.
Telecast Thursday - The Pick-a-Pocket Purse
It's another Telecast Thursday and this week I'm sharing some of my tips for constructing the Pick-a-Pocket purse. This free pattern can be found at www.allpeoplequilt.com, the American Patchwork & Quilting website. I've made several of these purses and decided to change it a bit this time.
To help ensure that you pass quality control, check out the video for my helpful tips.
You can watch the video below or on my Youtube channel.
Subscribe to my Youtube channel to receive automatic notifications when new videos are posted. You can also click on the Chatterbox Quilts logo in the lower right corner on the video itself to subscribe. If you like what you see, please share my videos with your fellow creatives.
Share your photos of your favourite purse pattern or photos of this specific one, if you've made it. Let me know your best tips for purse construction in the comments below.
Creatively,

Off the Power Grid and into "Me" Power
I have been looking for a nice treadle cabinet and a Singer 66 Red Eye (or Red Head) sewing machine for some time and lucky for me, I found them both in one package! Even better, I didn't have to travel hours (as I've been know to do) to get this machine and its cabinet as they were right here in Calgary.
My most recent vintage sewing machine acquisition was a bit of a departure for me. I opted for a non-electric vintage sewing machine. If you know vintage machines, you know this means either a hand crank or a treadle sewing machine. Guess which one I got? Yes, I purchased a treadle sewing machine.

The cabinet for my Singer 66 red eye sewing machine - before clean up (white spots are no longer there!)
I have been looking for a nice treadle cabinet and a Singer 66 Red Eye (or Red Head) sewing machine for some time and lucky for me, I found them both in one package! Even better, I didn't have to travel hours (as I've been know to do) to get this machine and its cabinet as they were right here in Calgary.

Slightly worn decals on the sewing machine
When I went to check out the machine and cabinet, I was more interested in the cabinet than the machine as I'd read that it can be harder to get a nice treadle cabinet. Machines can be switched in and out of cabinets, but these older cabinets can be very hard to find in my part of the country.

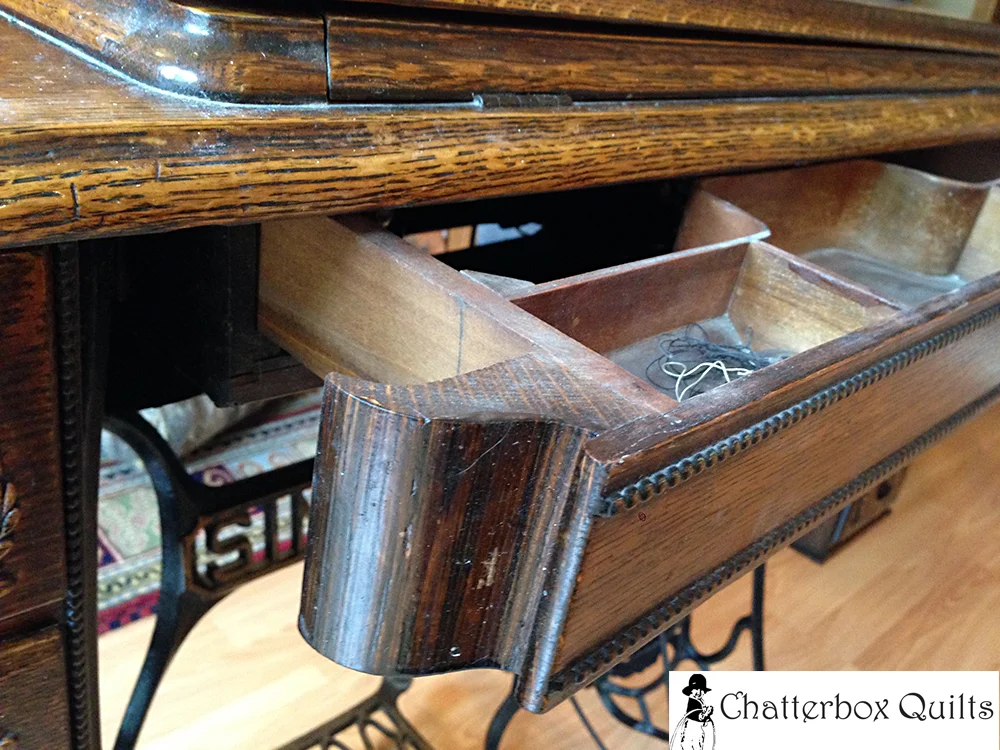
Drawer detail
When I got to the seller's house, I dealt with her husband as she wasn't at home. I managed to talk him down as to the price and hopefully didn't get him in too much trouble with his wife for doing so! He kindly helped us to remove the machine from the cabinet and helped load it into the Zoocrew (that would be our Honda Odyssey van).

If you check the serial number, you'll see that this machine is at least 100 years old!
If you don't know about this model, let me tell you a bit about it.
According to the Singer website:
"The Singer 66 or 66K was a heavy duty domestic sewing machines that set the standard for several decades, and indeed the Class 66 bobbin and the 66 style rotary hook arrangement are still in use on many ‘new’ sewing machines today. Because the 66K’s were full size machines weighing around 30lbs, they were usually sold in treadle tables or cabinets, although some hand cranked models, and later on some electric models, were also sold. The 66K first introduced the horizontally mounted rotary hook arrangement with drop in bobbins. A system which still survives in so many sewing machines from all makers today."

Getting ready to clean the machine.
The earlier models had back clamping attachments, which is what mine has (it was made around 1915). These can be changed so they can handle vintage side clamping attachments, but I haven't done anything about that yet.

Back clamping attachments (feet) on this model of the Singer 66
The advantage of the 66 model is the large harp space - which makes it great for quilting. The drawback is that there is no reverse and the feed dogs don't drop, although these can be covered with a plate for free motion quilting or darning (but who wants to darn clothing anyway?!).
The 66 Red Eye model of the Singer 66 sewing machine was produced in America and is quite colourful.
The decals on my particular machine are not in as good a shape as some that I've seen, as you can tell from the photos. Even with lots of cleaning, you can see that the decals just aren't there anymore. Sometimes they may be hiding under a layer of grime, but this wasn't the case with my machine.

The decals on my machine are worn, but everything else on the machine seems great.
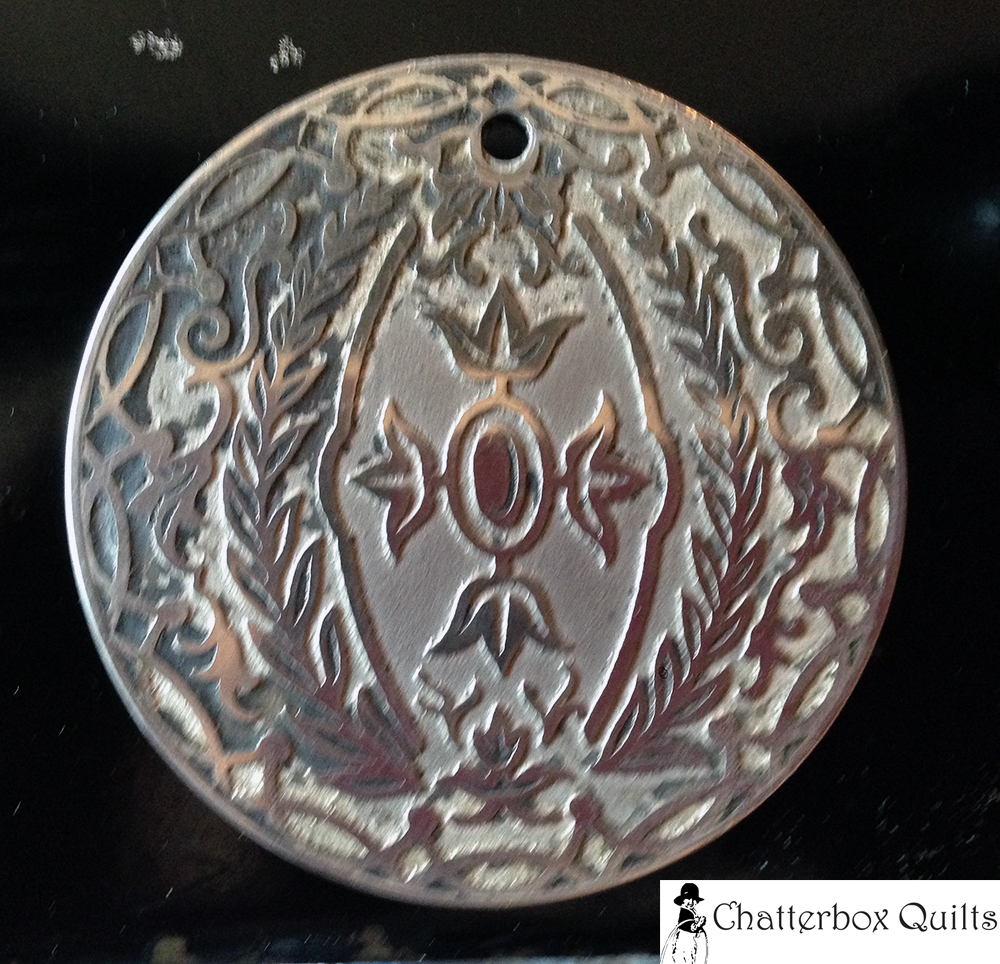
On the plus side, the chrome parts are in very good shape with no rust.

Face plate is beautifully ornate - but needs cleaning!
You can see the difference between one of the chrome plates that is only partially cleaned. Initially it was very dark, but with lots of elbow grease and metal cleaner, the silver began to show through. It's always amazing to me how these machines clean up with simple cleaners, time and some scrubbing.

See how dirty the chrome pieces were on this machine when I got it? Definitely need some elbow grease on these parts!
One of the chrome pieces partially cleaner - note the unclean, dark areas.
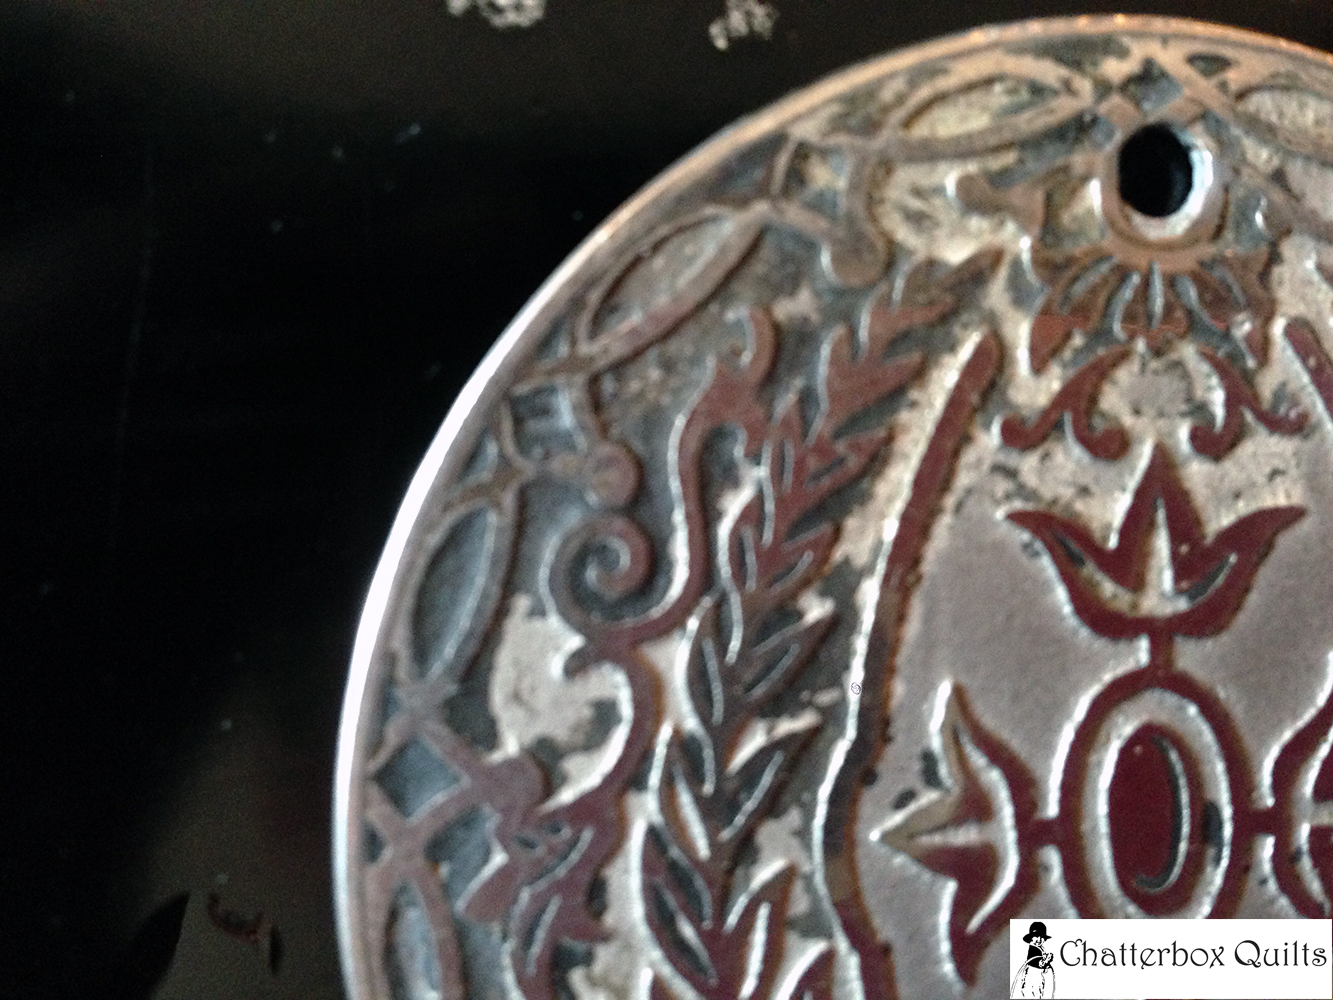
Still needs a bit more cleaning. I had to use a toothpick to get all the black grime out.
The cabinet had a few water marks on the top, but I easily removed these with Howard Products' Restor-A-Finish and steel wool. I then protected the cabinet with their Feed-N-Wax product.
If you'd like to see a bit more about my particular Singer 66 sewing machine, please watch the video below or view it on my Youtube channel.
Subscribe to my course, The Joy of Vintage Sewing Machines (at a 20% discount) to see how I clean up and repair my vintage machines. I'll walk you through all the steps of evaluating, acquiring and rejuvenating vintage sewing machines.
Now that I've got my first treadle sewing machine, I guess I'll be able to treadle any time, even if the electricity is off - after I learn how to treadle, that is!
Do you have a treadle sewing machine or other vintage machine? Send me your photos of them and remember to check out The Joy of Vintage Sewing Machines on Curious.
Creatively,

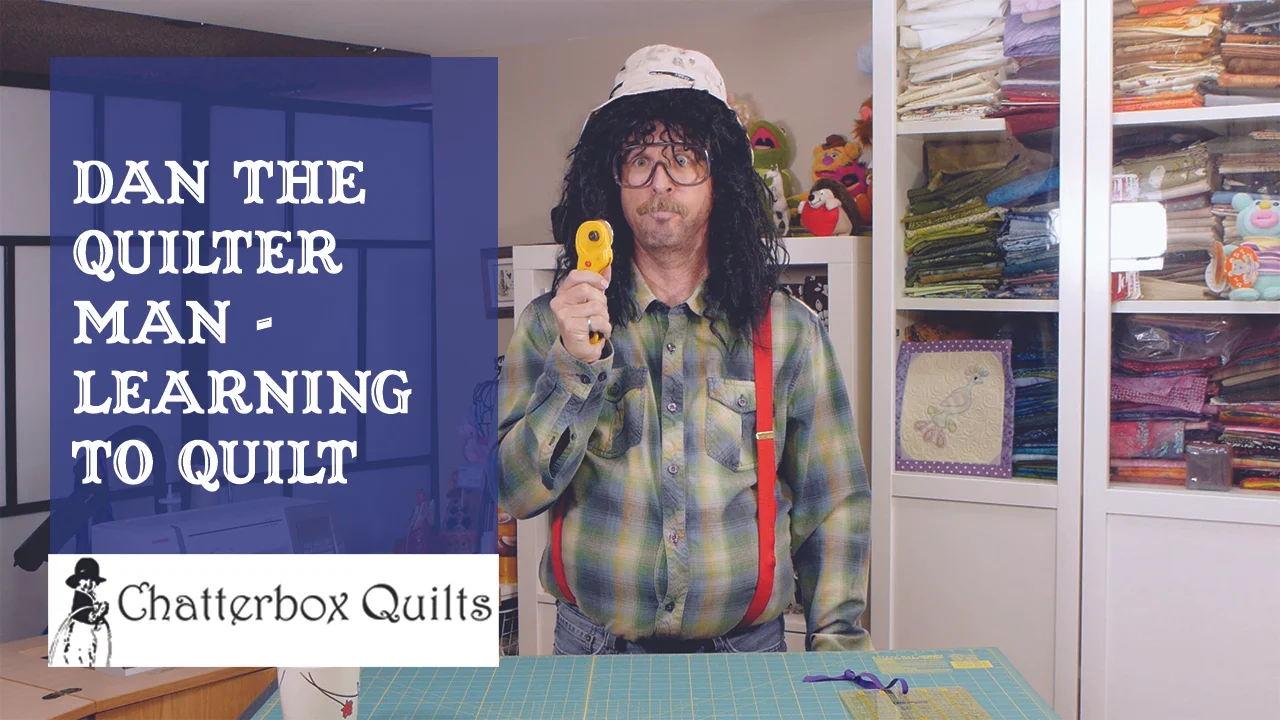
Dan the Quilter Man
One of the best things about being part of a crafting community is the interesting people you meet. There are many talented people out there who are have spent years honing their skills and creating stunning projects. Unfortunately, Dan is not one of them.
One of the best things about being part of a crafting community is the interesting people you meet. There are many talented people out there who have spent years honing their skills and creating stunning projects. Unfortunately, Dan is not one of them.
This is Dan the Quilter Man.

Dan is the type of guy who lives by the philosophy of “why bother to do it right when you can do it twice (assuming you survive the first attempt)”. It is not that Dan is stupid (although the jury is still out on that one), it’s that he refuses to invest the time to learn how to do things properly. This attitude combined with an unhealthy amount of curiosity and a complete lack of any ability to foresee the consequences of his actions results in one disaster after another.
For most people having a hobby is an important part of living a healthy life. However, in Dan’s case, hobbies are apparently designed to shorten his life span. Dan’s most recent hobby, wood working, resulted in a disaster that landed him on local news where the community got to see his woodshop burn to the ground. The only thing Dan managed to save was his buddy Charlie.
Now with lots of time on his hands (always a dangerous situation for someone like Dan) and the woodshop gone he has decided to take up a new hobby. Dan’s wife (who will remain nameless to protect the innocent) has been a quilter for years so Dan has decided to join her in that time-honoured hobby. Frankly, it is possible that the quilting community will never be the same.
NOTE: No cats were harmed in the making of this video - only Dan!
You can watch the video below or on my Youtube channel.
You can see that Dan's first attempt at using a rotary cutter wasn't very successful. Don't be a Dan! Follow these tips for safe rotary cutting:
- Always close your cutter after making your cut. Always! Get into the habit of cut, close, cut, close and you'll never have an unfortunate accident, like Dan.
- Use a ruler when you are rotary cutter to prevent the cutter veering off in an unexpected direction. Ouch!
- Keep one finger on the cutting mat and the other ones on the ruler. This helps to stabilize the ruler when rotary cutting.
- Pay attention when you are cutting. Don't let purry assistants, like Charlie, distract you from your task.
While I don't recommend cutting up your shirt to use for quilting, I sometimes buy shirts from the thrift shop for just this purpose. I found Bonnie Hunter's video helpful in deconstructing an old shirt for quilting fabric.
I hope you have better success in attempting your first quilting project and remember: don't be a Dan!
Creatively,

Welcome! I’m Kim Jamieson-Hirst of Chatterbox Quilts, a YouTube creator and host of The Quilter’s Way. I believe that quilting is more than just a 1/4” seam and that practice makes improvement and you are improving every day!
Contact me at kjh@chatterboxquilts.com.


Want to improve your quilting and have fun doing it? Join The Quilter's Way, a private online membership site that creates successful quilters.

Check out my favourite books and tools.
As an Amazon Associate I earn from qualifying purchases from links that you may find on the Chatterbox Quilts’ website.