
CHATTERBOX QUILTS’ BLOG
Helping Quilters Learn and Improve

Stitch and Flip Blocks
This one is one of my favourites: the Stitch and Flip Block. I've made a few table runners using this versatile block and I know that you'll create lots of projects with it too!This is a very simple block that only uses two fabrics for each block. Here's what you'll need:
- one 5" square of fabric
- two 2 1/2" squares of fabric
I wanted to share some more quick quilt blocks with you. This one is one of my favourites: the Stitch and Flip Block. I've made a few table runners using this versatile block and I know that you'll create lots of projects with it too!
This is a very simple block that only uses two fabrics for each block. Here's what you'll need:
- one 5" square of fabric
- two 2 1/2" squares of fabric
Be sure that the two fabrics have a strong contrast between them to get the desired effect - which is to see the design that you are creating.
I have used a charm square for one fabric and two mini-charm squares, that are both the same fabric, for the contrasting fabric that will be forming the new corners of this block. You can use different sizes to create this block, if you wish, just be sure that the two smaller squares are half the size of the background square. For example, if your background square is 7", the two smaller squares should be 3 1/2" each. See how good I am at math! :)
Here's what you need to do with these squares:
- Draw a diagonal line on the back of both of the smaller squares - the 2 1/2" ones in my example.
- Place these smaller squares, right sides together (RST), on opposite corners on the background (5" square in my example) square. Watch the video for fabric orientation.
- Stitch on the drawn diagonal line on both of the smaller squares (the 2 1/2" ones in my example).
- Trim off the excess corners, 1/4" away from the stitched lines.
- Press to the corners.
You will now have one Stitch and Flip Block completed.
Watch the video below or on my YouTube channel for correct fabric orientation for those smaller squares so you'll get the desired effect when you've finished stitching.
Be sure to subscribe to my YouTube channel to receive future video notifications. Share this or any (or all) of my videos with your quilting friends. I'd be so appreciative.
This is a great block to make a heartfelt quilt as it forms X and O blocks. I've shown you a few ways you can combine Stitch and Flip Blocks, but if you have more ideas, please post them in the comments below.
Creatively,


Book Review - One Bundle of Fun
This week I'm taking a break from quick quilt blocks to share a book review with you. If you like to create pre-cut quick quilts, this is the book for you!
One Bundle of Fun by Sue Pfau isn't a thick book, but it is packed with great quilt designs and the best part is that they are all created with pre-cuts - and that's it! This book appealed to me as you could actually create all of the quilts in One Bundle of Fun without adding any additional yardage - except for the backing, of course. Don't get me wrong, there are plenty of wonderful pre-cut books on the market, but I get frustrated when I'm ready to make one of them and then realize that I still need to have several yards or metres of additional fabric for sashing or borders. Not the case with this book at all.
I also liked the designs that were created. I found them intricate and interesting and there were several levels for beginning to more advanced quilters.
To see more of One Bundle of Fun, please watch the video below or on my YouTube channel.
Purchase your own copy of One Bundle of Fun and start clearing our your stash of pre-cuts (or am I the only one with these?!)
If you like this video, please give it a thumbs up on YouTube and subscribe to receive all my future videos. I'd be so grateful if you would also share this video with your quilting friends.
Creatively,


Half Square Triangles: Combination Unit
I'm featuring another quick block that can be created from half-square triangles or half square triangles or HST - it seems there are lots of ways to name these cute little units. These Combination Blocks contain three fabrics so I would suggest that you have a contrast between them for the proper effect. You'll need:
- 1 square of fabric
- 1 half-square triangle the same size as your fabric square
This week I'm featuring another quick block that can be created from half-square triangles or half square triangles or HST - it seems there are lots of ways to name these cute little units.
These Combination Blocks contain three fabrics so I would suggest that you have a contrast between them for the proper effect. Nobody likes ineffective and unexciting Combination Blocks!
What do you need to create a Combination Block? I'm glad you asked :) You'll need:
- 1 square of fabric
- 1 half-square triangle the same size as your fabric square
I used a charm square and a 5" half-square triangle, but any size will work as long as the two squares are the same size to start.
That's it!
Now I suppose you'll want to know what to do with them, won't you? Okay, this is what you do next:
- Mark a diagonal line on the back of the fabric square for your stitching guide
- Put the two squares right sides together (RST - another quilting acronym!), and stitch 1/4" away on either side of the diagonal marked line. Note the fabric orientation in the video!
- Cut the squares apart on the drawn diagonal line and voilà: you have two Combination Blocks.
To see all of the steps in action, watch the video below or on my YouTube channel.
There are lots of different orientations you can use with these Combination Blocks to create interesting designs. I've shown you a few, but if you have more ideas, please leave a comment below.
As always, I hope you enjoyed this video and be sure to subscribe to my YouTube channel so you will receive notification when I post the next video. I'd sure appreciate it if you would share this video with your quilting friends.
Creatively,


Half Square Triangles: Hourglass Units
I'm working on an hourglass unit. These little units are created from half-square triangles. You'll get two hourglass units from two half-square triangles. Hourglass units are versatile and I'm sure you'll find lots of uses for them in your quilts.
Welcome to Telecast Thursday!
I hope you've been enjoying my mini tutorials on half-square triangles. I've created a playlist on my YouTube channel where you can view two different techniques for making them. I'll be adding this tutorial to that playlist as well so it will be easy to find the instructions to make all these units.
This Telecast Thursday I'm working on an hourglass unit. These little units are created from half-square triangles. You'll get two hourglass units from two half-square triangles. Hourglass units are versatile and I'm sure you'll find lots of uses for them in your quilts.
Watch the video below or on my YouTube channel to see how quickly you can whip up some hourglass units.
Let me know in the comments below if you've made hourglass units and your method for creating them.
Creatively,


One World Quilt Along Block 6

Block 6 of the One World Quilt Along has just been released and this is the last horizontal block in this quilt. It's actually the last full block in the entire quilt as the sashing, borders and one appliqué element will be what we're working on next month.
I saw this block as the perfect opportunity to use some metallic thread on the snowflakes in this block. I was pleased that my Janome 8900 handled the metallic thread with no problem at all. I just had to reduce the top tension on my sewing machine and be sure to use a large enough needle and it was just like stitching with any other type of quality thread.

Keith's version of Block 6
If you haven't joined the One World Quilt Along, don't hesitate to join us now. Each block in the quilt is constructed individually so you can really start working on any block - you don't have to start with Block 1. There are two subscription options: Quilter or Viewer. Check out the details here.
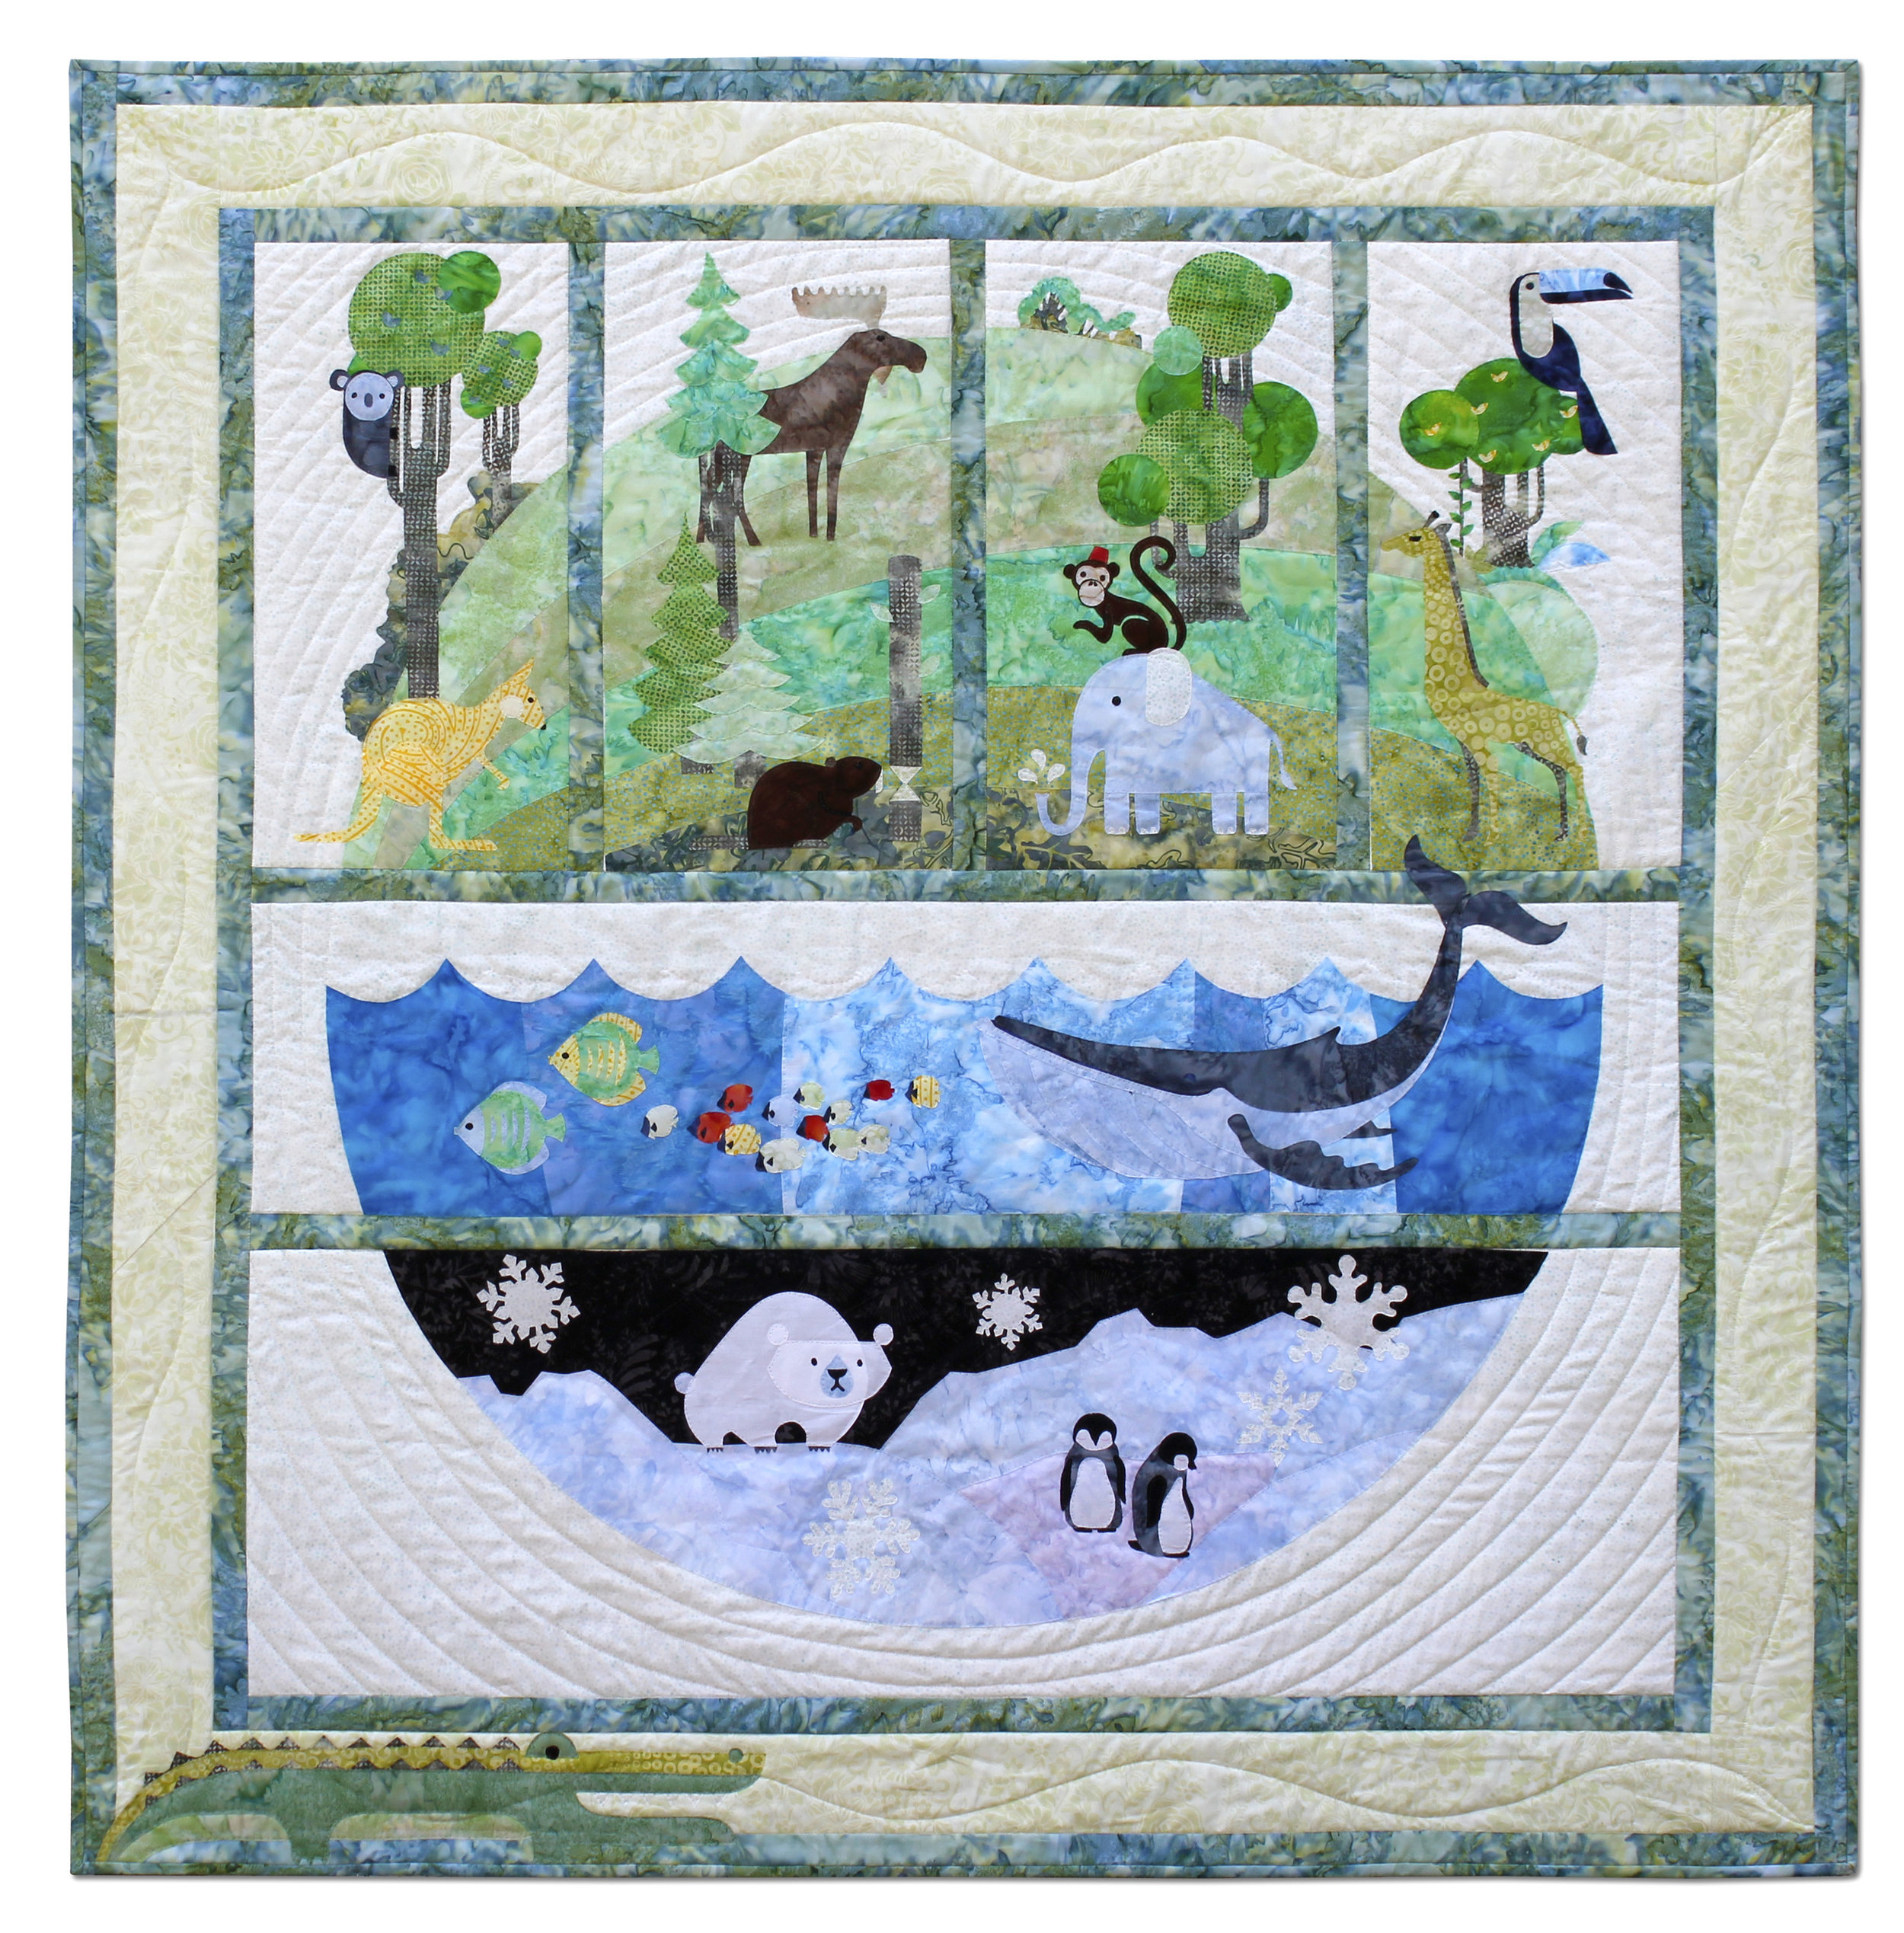
Keith's version of the One World quilt
If you are already subscribed in the One World Quilt Along, be sure to check out all videos that Keith and I have created. They provide tips and information to help you construct your quilt.
Have fun with this month's block and see you March 15, 2017 for the final part of this quilt.
Creatively,


Welcome! I’m Kim Jamieson-Hirst of Chatterbox Quilts, a YouTube creator and host of The Quilter’s Way. I believe that quilting is more than just a 1/4” seam and that practice makes improvement and you are improving every day!
Contact me at kjh@chatterboxquilts.com.


Want to improve your quilting and have fun doing it? Join The Quilter's Way, a private online membership site that creates successful quilters.

Check out my favourite books and tools.
As an Amazon Associate I earn from qualifying purchases from links that you may find on the Chatterbox Quilts’ website.