Fabric Stabilizer for Decorative Stitches

Have you ever added a beautiful line of decorative stitching to a garment or a quilt and was disappointed by the finished look? Was the fabric all scrunched up around the stitches? Don't fret! I have the solution for this situation and it is very simple: stabilizer.

Most decorative stitches are similar to a satin stitch: there are lots of thread close together in most decorative stitches and they need more support than just fabric underneath them. This is where stabilizer comes in. Just like the foundation of a building supports the floors above it, stabilizer provides the right foundation for decorative stitches. 

There are different kinds of stabilizer: tear away, wash away, and heat away are some of the more common ones. I like to use tear away stabilizer in my projects as it is economical and easy to remove. Yes, I would suggest a removable stabilizer in my quilt projects. Garments may already have stabilizer in the areas where you want to add a decorative stitch, but if not, a stabilizer that will remain in the garment is common. There are also various weights of stabilizers, but I prefer to use a regular weight tear away stabilizer and add more layers of it underneath if that is required. It's always a good idea to make a sample first when you want to use a decorative stitch to ensure that the settings for the stitch and the stabilizer are working well together. 

 
One of the many types of fabric stabilizers available to use. Find more by clicking above.

One of the many types of fabric stabilizers available to use. Find more by clicking above.


In the video below, or on my YouTube channel, you can see the enormous difference that stabilizer makes when adding a decorative stitch to your project.

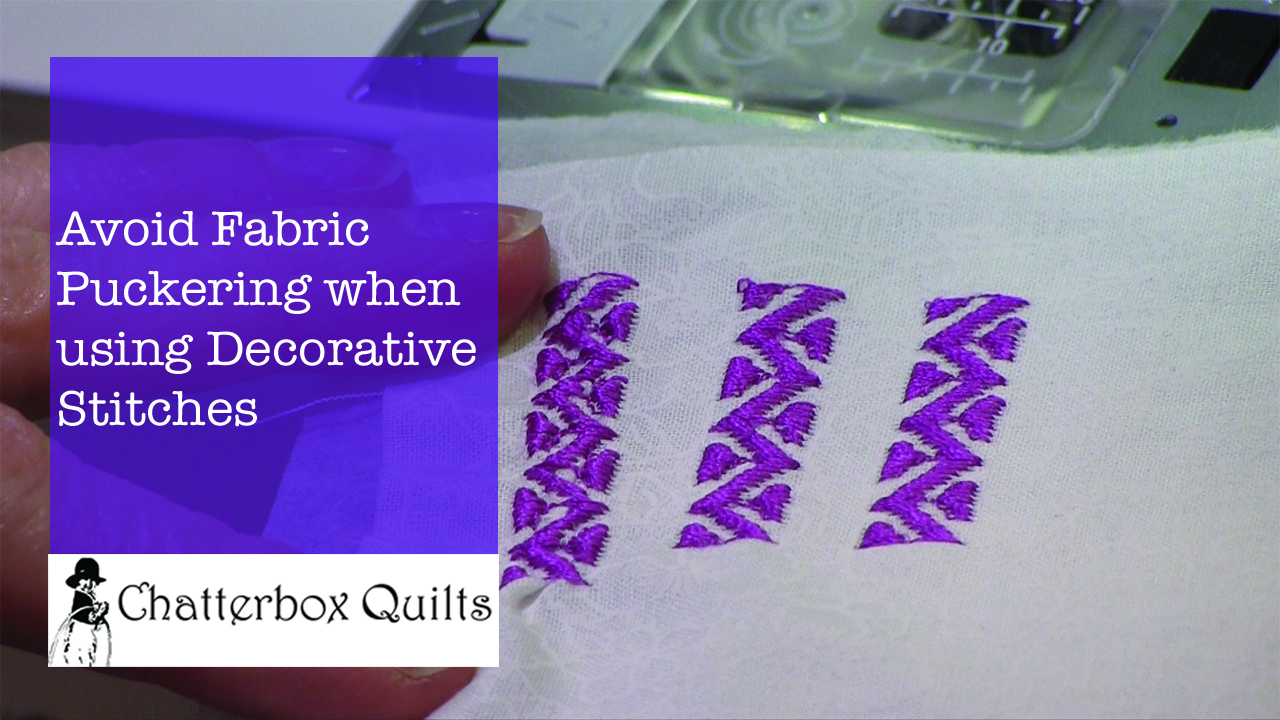
If you're having problems with your decorative stitches turning out the way you want them to, try adding some stabilizer underneath your base fabric. I'm sure this will make all the difference in the world.

Do you add decorative stitches to your projects? Let me know your favourite type of stabilizer in the comments below.

Creatively,

Kim's signature small.jpg
 

P.S. Did you know that you can sign up to receive FREE emails full of quilting goodness? Just click here to receive FREE content directly in your email inbox every few weeks from Chatterbox Quilts. I know you'll be glad you did!

P.P.S. I am an Amazon affiliate and as such will receive a small amount of compensation if you purchase products by clicking through the links in this blogpost. Thank you for continuing to allow me to create free content.

What are all Those Buttons for on the Janome Horizon Memory Craft 9400 QCP?

With any new tool, there is a lot to learn. When you have a new sewing machine, there are millions of things to learn! Okay, maybe not millions, but there are at least hundreds of stitches, buttons and settings that you need to investigate. 

It's essential to go through your sewing machine manual to learn what the capabilities are of a new machine. I've been working with the Janome Horizon Memory Craft 9400 QCP, courtesy of Janome Canada and I've found that the sewing machine manual is an essential reference document in this process: and it is a process! You can't learn everything about a new sewing machine in one sitting and it's probably a good idea to block out some chunks of time to dedicate to becoming familiar with a new sewing machine.

I've found it is easiest to start with the obvious. There are several buttons on the front of the Janome Horizon Memory Craft 9400QCP and in this video I'll tell you about their functions.

You can watch the video below or on my YouTube channel.

You can see how important these particular buttons are on the Janome Horizon Memory Craft 9400 QCP and I think that they are well placed as these are features that you would frequently use. 

As I mentioned earlier in this blogpost, there are many different options and features on this Janome sewing machine and I'll be taking a look at them in upcoming videos and blogposts. If there are any specific questions you have about this amazing machine, please post them in the Comments below.

Creatively,

Kim's signature small.jpg
 

Fusible Web Appliqué Overview

Fusible web appliqué, or raw edge appliqué as some people call it, is the easiest form of appliqué, at least in my opinion. It's easy and fast and perfect for an appliqué beginner. The only thing you need to remember is that wrong is right! You are working with the wrong side of the fabric for your appliqué pieces, not the right side. Keep this in mind as you work through this technique and everything will turn out just fine.

 
Fusible Web Appliqué used to construct designs in Tweet-Heart pattern by Chatterbox Quilts

Fusible Web Appliqué used to construct designs in Tweet-Heart pattern by Chatterbox Quilts


You don't need many tools to do fusible web appliqué: some fusible web, a marking pen or pencil (I like to use a Sharpie Extra Fine Point Permanent Marker) and the appliqué template. You just need to trace the appliqué shape onto the fusible web, cut the shape out and then press it to the wrong (back) side of the fabric. Next you cut the shape out exactly on the drawn line, remove the paper lining and iron the appliqué shape to the background fabric. Simple, isn't it?

To give you an idea of how to do this type of appliqué, please watch the video below or on my YouTube channel.

I use fusible web appliqué in all my patterns and the sample I'm using in the video is part of the Community quilt which I made for a quilt along that I hosted.

Have you tried fusible web appliqué? Let me know your thoughts on this simple technique in the comments below.

Creatively,

Kim's signature small.jpg
 

Book Review - Moda All-Stars Lucky Charm Quilts

The Moda All-Stars have published another book! Well, actually That Patchwork Place has published the book, but it is another one in the Moda All-Stars' series.

Lucky Charm Quilts includes 17 patterns that use charm squares or 5" squares or nickel squares. Whatever you call them, you'll find lots of projects for them in this book. As with their other books, royalties from Lucky Charm Quilts are going to charity, so that's an added bonus!

There are a variety of techniques used in these projects from pieced to appliqué, so there is something for every quilter. There is also a variety of project sizes in the book from table runners to pillows to lap quilts. Some of the patterns use more than one charm pack, so be sure to pick up several of the same line when you're next at your local quilt shop. :)

To see more of the designs in Lucky Charm Quilts, please watch the video below or on my YouTube channel.

Get your own copy of Moda All-Stars Lucky Charm Quilts so you can make wonderful projects with your charm squares.

Leave a comment below to let me know your favourite pre-cut to use in your quilt designs.

Creatively,


P.S. Please join me in the private Chatterbox Quilts Facebook group for information on quilting topics and vintage sewing machine discussions. I hope to see you there :)

Disclaimer: I am an Amazon affiliate and will receive a small amount of compensation if you purchase by clicking through a link in this blog post. Thank you for allowing me to continue to create free content for you.

Schedule Changes for Chatterbox Quilts

Hi everyone:

If you are one of my Facebook followers you will have been enjoying my Facebook Live videos every Thursday. If you are one of my YouTube subscribers, you will also have been able to view a new video each week, also on Thursday. I realized that you have the opportunity to watch two different videos on the same day and thought that it would probably be better to adjust my video schedule just a bit.

Starting this week, I'll be changing my video schedule so you'll be able to watch my Facebook Live video every Thursday at 1:00 pm MST (you can always catch the replay on my YouTube channel or on my Facebook page afterwards) and my regular Youtube video, with the accompanying blogpost, every Tuesday.

What does this mean for this week? There will be a Facebook Live video on Thursday, September 7, 2017 and no regular YouTube video on that day. The regular YouTube video and blogpost for it will be released on Tuesday, September 12, 2017 and every Tuesday thereafter. So you'll miss one week of a regular YouTube video, but you'll still see me on my Facebook Live this week.

I think this will be a better video schedule for you, my subscribers and viewers, as you'll see me twice in one week. I hope you don't get tired of listening to me ;)

Sign up as one of my Facebook followers and/or YouTube subscribers so you'll be notified when new content is released every week.

If you are already one of my subscribers, thanks so much for watching and commenting on my videos. I really enjoy creating them for you and hope you find value in them.

Creatively,