
CHATTERBOX QUILTS’ BLOG
Helping Quilters Learn and Improve

Book Review: Lunch-Hour Patchwork
Another book in the Lunch-Hour series by Martingale & Company, Lunch-Hour Patchwork features 15 easy to start and easy to finish projects by a variety of designers.

Photo courtesy of www.martingale-pub.com
Some of the projects you’ll find in Lunch-Hour Patchwork are a tote bag, a wall hanging, a picture frame, and a needle book. These projects are all simple enough for beginning quilters and just the right size to learn a new technique.
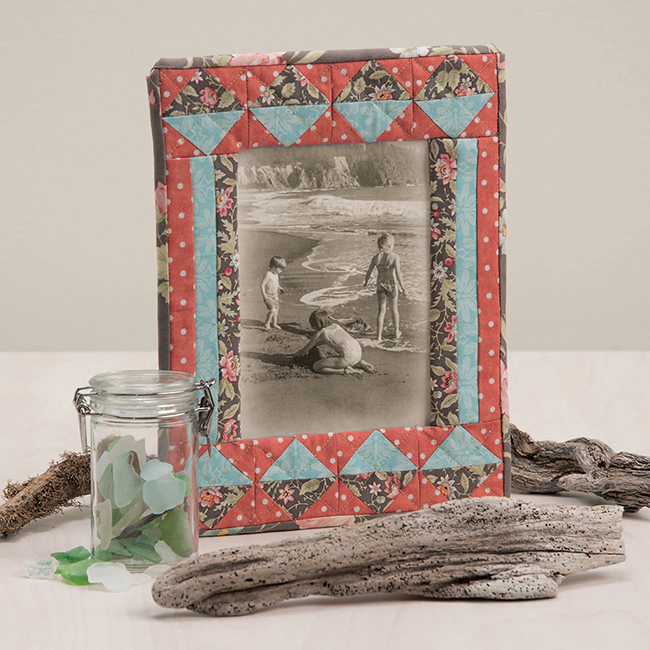
Photo courtesy of www.martingale-pub.com
As the title indicates, these are pieced projects – not an appliqué project in the mix at all.
Since these projects are small in size, they are also good choices for using up your fabric scraps.
The various projects in Lunch-Hour Patchwork are also quick to make so if you need a quick gift, you can finds lots of ideas in this book.

Photo courtesy of www.martingale-pub.com
As there are a variety of techniques used to create the projects in Lunch-Hour Patchwork, they are good choices if you want to sample a new technique without having to commit to a large project – just in case you don’t like that particular technique.
You can see more of the projects in Lunch-Hour Patchwork by clicking on the image below to watch a video on my YouTube channel.

For your own copy of Lunch-Hour Patchwork, click here.
Creatively,

P.S. Did you know that you can sign up to receive FREE emails full of quilting goodness? Just click here to receive FREE content directly in your email inbox every few weeks from Chatterbox Quilts. I know you'll be glad you did!
P.P.S. I am an Amazon affiliate and will receive a small amount of compensation if you purchase a product by clicking through links in this blogpost. This allows me to continue to provide you with FREE content each week. Thank you.

Perfect 1/4" Seams with the Janome MC9400 O Foot
This is the last blogpost in my series about the new feet included in the Accessory Upgrade Kit for the Janome MC9400. Just because it is the last blogpost does not mean that the foot I’m going to tell you about is the least of the feet included in the kit. If you aren’t familiar with the Accessory Upgrade Kit and what is included in it, click here.
For most quilters, stitching a perfect ¼” seam is a constant struggle and any help we can get to achieve this is most appreciated. One of the feet included in the Accessory Upgrade Kit for the Janome MC9400 will definitely help you stitch that perfect ¼” seam. It is the O foot or ¼” seam foot without guide. Let’s take a closer look at this foot.
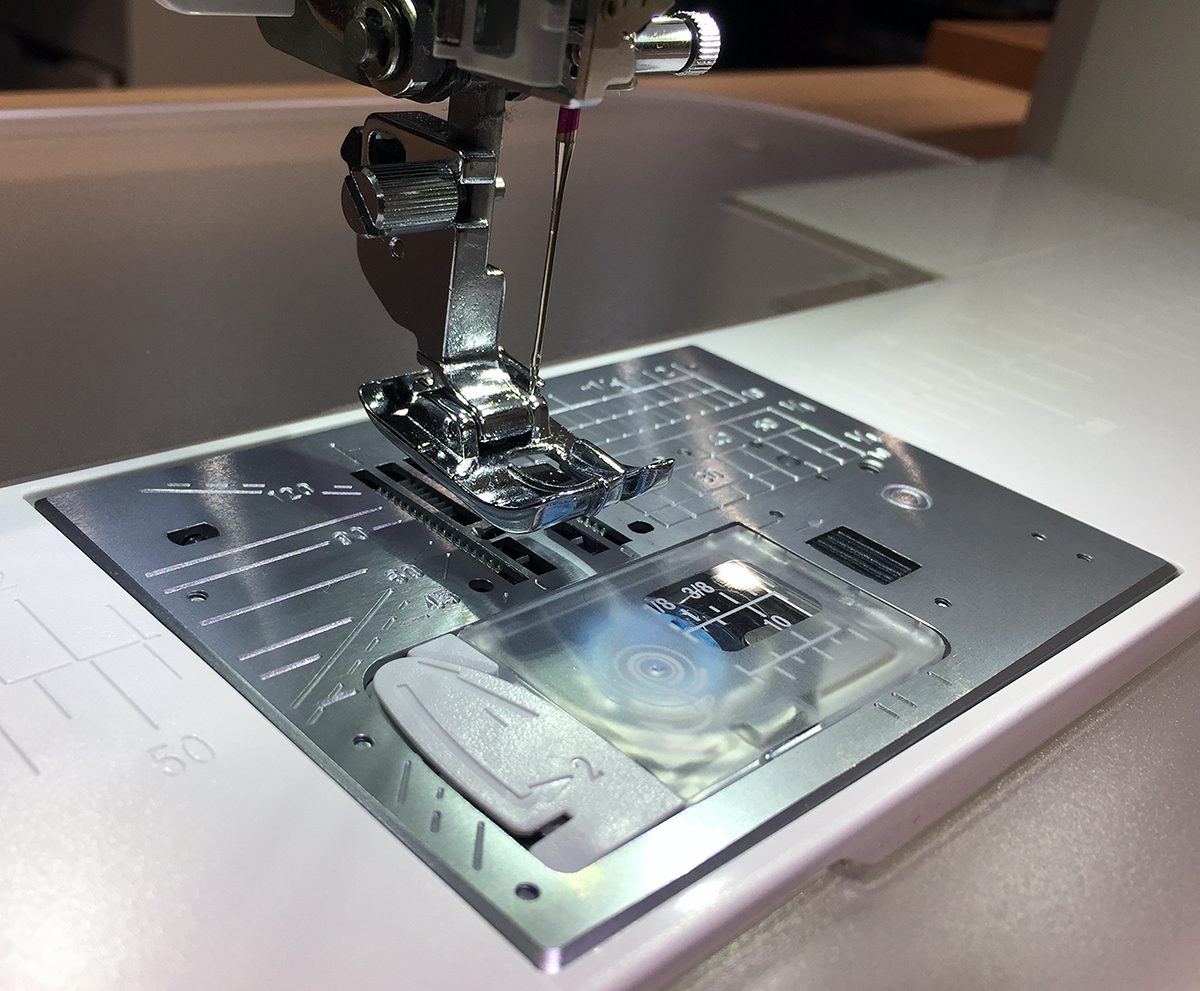
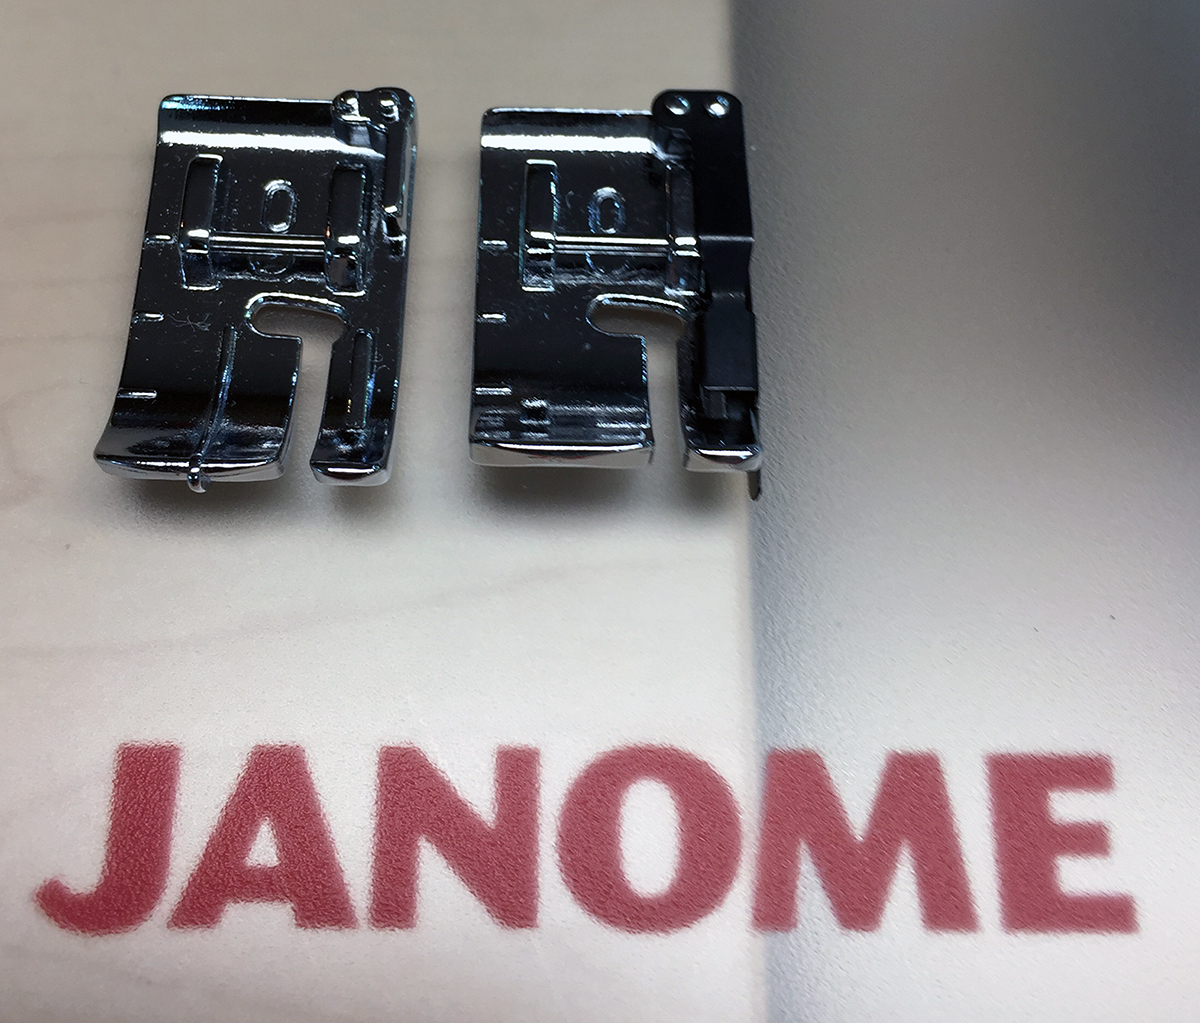
If you are thinking that you may already have an O foot in your Janome MC9400 accessory storage box, you’re right! There is, however, a significant difference between that foot and the new O foot: the new O foot doesn’t have a guide on it. The black metal piece that is on the right side of the foot when viewing it on your machine has now been removed. This guide is helpful for running along the edge of your fabric when stitching a ¼” seam. While I like this foot, I sometimes find that the metal piece can catch on loose threads and cause issues if I’m not watching carefully. You won’t have this problem with the new O foot as the black metal guide has been removed.
There are some other helpful features on the new O foot that I know you’re going to like. You will notice that there are some additional markings on this foot. There is a raised metal piece that extends to the edge of the front of the foot and this is ¼” away from the needle drop position. While this sounds complicated, what it really means is that you can use this guide to stitch another line ¼” away from a previously stitched line.
There are also three ¼” markings on the left side of the foot and these can be used in different situations, such as when you are at a corner and want to stop ¼” away from it to turn your fabric – or ½” or ¾” inch.

If you’ve been using your original O foot on your Janome MC9400 and wishing that it didn’t have the metal guide on it, you’ll appreciate the new O foot without the guide as well as the additional markings on the foot.
For more information on the O foot and to see it in action, click on the image below.

Creatively,

P.S. Did you know that you can sign up to receive FREE emails full of quilting goodness? Just click here to receive FREE content directly in your email inbox every few weeks from Chatterbox Quilts. I know you'll be glad you did!

New Open-Toe Darning Foot for the Janome MC9400
Another new foot for the Janome MC9400!
You might wonder why the PD-H foot or darning foot is included in the Accessory Upgrade Kit for the Janome MC9400 and that’s a good question. If you aren't familiar with the Accessory Upgrade Kit and what it includes, click here for more information. Once you see it, you will understand: unlike the original PD-H foot included with the Janome MC9400, this is an open-toe foot. What does that mean and why should you be excited about it? Let me tell you.

The new PD-H darning foot will look similar to the original PD-H foot, with one big exception: there is a cut out at the front of the foot between the two red lines. This foot is an open-toe one, which means that you will have excellent visibility when using it.

As a quilter, I use this foot for free motion quilting and the better I can see my stitches when quilting, the better I like it! If you are a sewist, you will also find it easier to see what you are sewing when using it for darning or other applications.
I like to use the stitches in the Quilting area under the Sewing Application icon for this foot and you won’t notice any difference on your display screen. You will, however, notice a difference in how well you can see your sewing path when you are using the open-toe PD-H foot.
I would caution you on one thing when using the open-toe PD-H foot on your Janome MC9400: be careful not to catch the open area at the front of the foot on any loose threads or fabric as you are stitching along. As there is an opening at the front of the PD-H foot, it can catch on areas such as these. As long as you are watching where you are stitching, this shouldn’t be any problem.
I’m sure you’re going to really notice a difference when free motion quilting or darning on your Janome MC9400 with the open-toe PD-H foot and will appreciate the extra visibility.
To learn more about the open-toe PD-H foot, click on the image below to watch a video.

Creatively,

P.S. Did you know that you can sign up to receive FREE emails full of quilting goodness? Just click here to receive FREE content directly in your email inbox every few weeks from Chatterbox Quilts. I know you'll be glad you did!

Variable Zigzagging with the Janome MC9400
While I'm not sure if "variable zigzagging" is actually a verb, you'll be able to do it with the new QZ foot included in the Accessory Upgrade Kit for the Janome MC9400. For information about the Accessory Upgrade Kit and what new feet are included in it, click here.

The Variable Zigzag foot or QZ foot is the tiniest of the four feet in the kit. It is an open-toe foot, so it gives you a perfect view of your stitches. It allows you to create zigzag stitches up to 9 mm in width and, using the knee lifter, you are able to vary the width of these stitches. It’s sort of “look ma, no hands” stitching.

The QV foot originally included with your Janome MC9400 when you first bought it was used for variable zigzag stitching and while it can still be used for this purpose, I can see using the QZ foot going forward. The QV foot is perfect for free motion quilting around appliqués and for echo quilting as it has red lines on it that you can use for this purpose. The only issue that I sometimes have with this foot is that it reflects the light when I am stitching, making it difficult to see my stitching path. The open-toe design of the QZ foot eliminates this issue.

To start zigzagging with the QZ foot, click on the Sewing Application icon (the t-shirt icon) and choose “Quilting”. While the VZZ (variable zigzag) screen is still in this area, after you’ve upgraded your Janome MC9400, you’ll notice that it has changed slightly to include “RW” or Ruler Work. Options in the screen for variable zigzag stitching remain the same.
Like most of the presser feet included with the Janome MC9400, the QZ foot fits onto the presser foot holder. You just have to pay attention that you snap the presser foot holder onto both of the metal bars on the QZ foot, just like you do with the QC and QO feet. For more information on these feet and how to attach them, click here.
Once you’ve installed the QZ foot on the Janome MC9400, you’ll be ready to start having fun creating varying widths of zigzag stitches. This can take some practice as you have three things to thing about: controlling the machine speed with your foot pedal, moving the quilt under the needle and using your knee to vary the stitches by moving the knee lever out and in.
Click on the image below to learn more about the QZ Variable Zigzag Foot.

While the QZ foot is the foot to use for thread painting, it can also be used for creating unique stitch embellishments on your projects. With practice, you’ll be able to create dense satin stitches of varying widths or more open zigzag stitches. Remember to use a fabric stabilizer for satin stitches as the denseness of the stitches will distort your fabric if you forget this important step.
While you might only think of thread painting for the application of the QZ foot, consider using variable zigzag stitches to embellish the edges of your appliqué designs or as unique touches on garments.
Creatively,

P.S. Did you know that you can sign up to receive FREE emails full of quilting goodness? Just click here to receive FREE content directly in your email inbox every few weeks from Chatterbox Quilts. I know you'll be glad you did!

Ruler Quilting is Now Here!
The wait is over! For those of you who have been patiently waiting for the “official” ruler foot to be released, you’ll be thrilled to know that the QR ruler foot is included in the Accessory Upgrade kit for the Janome 9400. (If you're not familiar with the Accessory Upgrade Kit and what feet are included in it, click here.)
Once you have upgraded the software on your Janome MC9400, you’ll notice that there is a new addition to your display screen: RW or Ruler Work. By choosing one of the options under this menu, the Janome MC9400 will automatically ensure that there isn’t any problems using the automatic presser foot lifter and the QR foot. No need to worry about breaking a needle, damaging the presser foot or the Janome MC9400 itself.

I had the opportunity to try out this new foot on my Janome MC 9400 and I love it! The QR foot is integral with its own foot holder, much like the Janome HP foot, which makes it super quick to attach to the machine.

Ruler feet are always thicker than your other presser feet and visibility can sometimes be an issue because of this. This isn’t a problem with the QR foot though as Janome has carefully thought out the design of this foot: it has a U-shaped cut out at the front of the foot which means you can see what you are stitching, which is so very helpful.
When using the QR foot, you’ll need to use quilting rulers, like those that long-arm quilters have been using for years. These rulers are thicker than the acrylic rulers that you use when cutting with your rotary cutter.
DO NOT USE CUTTING RULERS WITH THE QR FOOT.
Okay, sorry for shouting, but this is a very important point. You must use rulers that are at least ¼” thick when doing ruler work to avoid having the ruler slide under the foot and damaging the needle and possibly your machine.
If you are new to ruler work, I would suggest getting a straight edge ruler to start to see if you like to do this technique (not everyone is enamoured with ruler work). There are lots of quilting rulers available, so be sure that you want to add this technique to your quilting arsenal before you spend lots of $$$ on rulers that you may never use.
I am working with two Handi Quilter rulers (the Handi Quilter VersaTool and the Handi Quilter Ditch Ruler) in the video as I use these on my Handi Quilter Infinity and they are good ones to start with if you are a beginner.
If you decide that ruler work is for you, you’ll have lots of fun choosing rulers to use when ruler quilting on the Janome MC9400.
Click on the image below to watch a video about attaching and using the QR ruler foot on the Janome MC9400.

Have you tried the QR ruler foot yet? Let me know your thoughts in the Comments below.
Creatively,

P.S. Did you know that you can sign up to receive FREE emails full of quilting goodness? Just click here to receive FREE content directly in your email inbox every few weeks from Chatterbox Quilts. I know you'll be glad you did!
P.P.S. I am an Amazon affiliate and will receive a small amount of compensation if your purchase a product by clicking through links in this blogpost. This allows me to continue to provide you with FREE content each week. Thank you.

Welcome! I’m Kim Jamieson-Hirst of Chatterbox Quilts, a YouTube creator and host of The Quilter’s Way. I believe that quilting is more than just a 1/4” seam and that practice makes improvement and you are improving every day!
Contact me at kjh@chatterboxquilts.com.


Want to improve your quilting and have fun doing it? Join The Quilter's Way, a private online membership site that creates successful quilters.

Check out my favourite books and tools.
As an Amazon Associate I earn from qualifying purchases from links that you may find on the Chatterbox Quilts’ website.