Hand Embroidery to Machine Embroidery with the Janome 500E
One of the things I enjoy doing with my Janome 500E is to convert some of my original hand embroidery designs into machine embroidery. I thought that one of my patterns, Snowflake Brrr! would be perfect to turn into a machine embroidered wall hanging and I knew that this would be so easy with my Janome 500E.
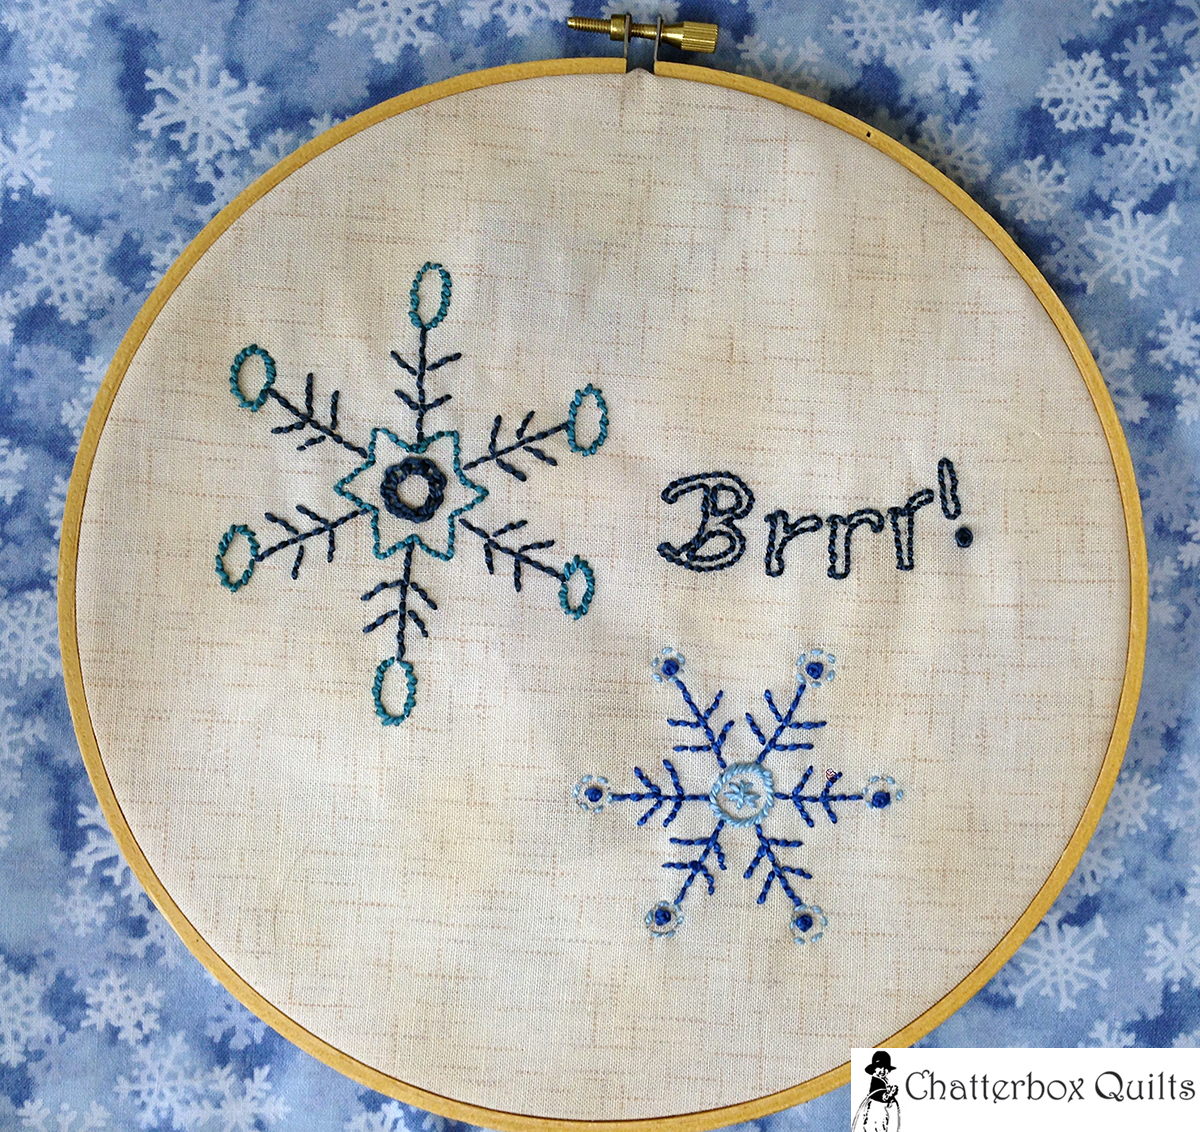
The original Snowflake Brrr! design was created using simple hand embroidery stitches (the FREE design can be found on my Craftsy store). I wanted to translate this look into machine embroidery and used the Creative Drawings software that came with my Janome Artistic Edge to translate my hand embroidery svg file into a .JEF format for the Janome 500E, choosing decorative stitches in the place of the hand embroidered ones. I had lots of fun playing around with all of the stitch choices available and could've spent hours (more than I already had!) doing this, but I eventually settled on the ones you see in the photo above for Snowflake Brrr! 2.0. I transferred the design to a USB stick and plugged it into the Janome 500E, so it would be ready for stitching.
Once I had chosen the stitches, it was time to decide on threads. I chose three different thread colours: a glittery light turquoise blue, a medium blue and a dark navy. Now it was time to prep my fabric and get stitching!

I used a tear away stabilizer underneath my fabric. I always do a test stitch out first and for this first stitching I used only one layer of stabilizer. My stitching results weren't bad, but there was some puckering around the "Brrr" in the design. For my "real" project, I added an additional layer of stabilizer and the results were perfect. I used a 10" square of white tone on tone fabric for my background.

Once I had my two layers of stabilizer underneath my fabric, I hooped everything in to the SQ20b hoop that came with my Janome 500E. I was now set to start stitching.

I was really pleased by the contrast between the different thread colours. Initially I had chosen a single running stitch for the "veins" on the snowflakes, but again, in my first stitch out, I didn't feel that they were thick enough. I chose a thicker running stitch and was glad I did as the snowflakes now appeared more balanced.

When my Janome 500E had finished its job, I removed the hoop from the machine and took a minute to admire the results.

There were a few connecting stitches between parts of the snowflakes, so I trimmed these off before I removed the project from the hoop. I found it easier to do this as the fabric was taut and this made it easier to trim off these threads.

Next step was to remove the embroidered Snowflake Brrr! 2.0 from the hoop. This is such an easy step ;)

Just in case you were wondering what the back of the project looked like - here it is! Notice the bit of a thread nest on part of the "Brrr". While this can be seen on the back, there is no indication on the front that this occurred. I think that part of the thread might have separated and gotten pulled to the back, but as long as the front looks good, this isn't a problem.

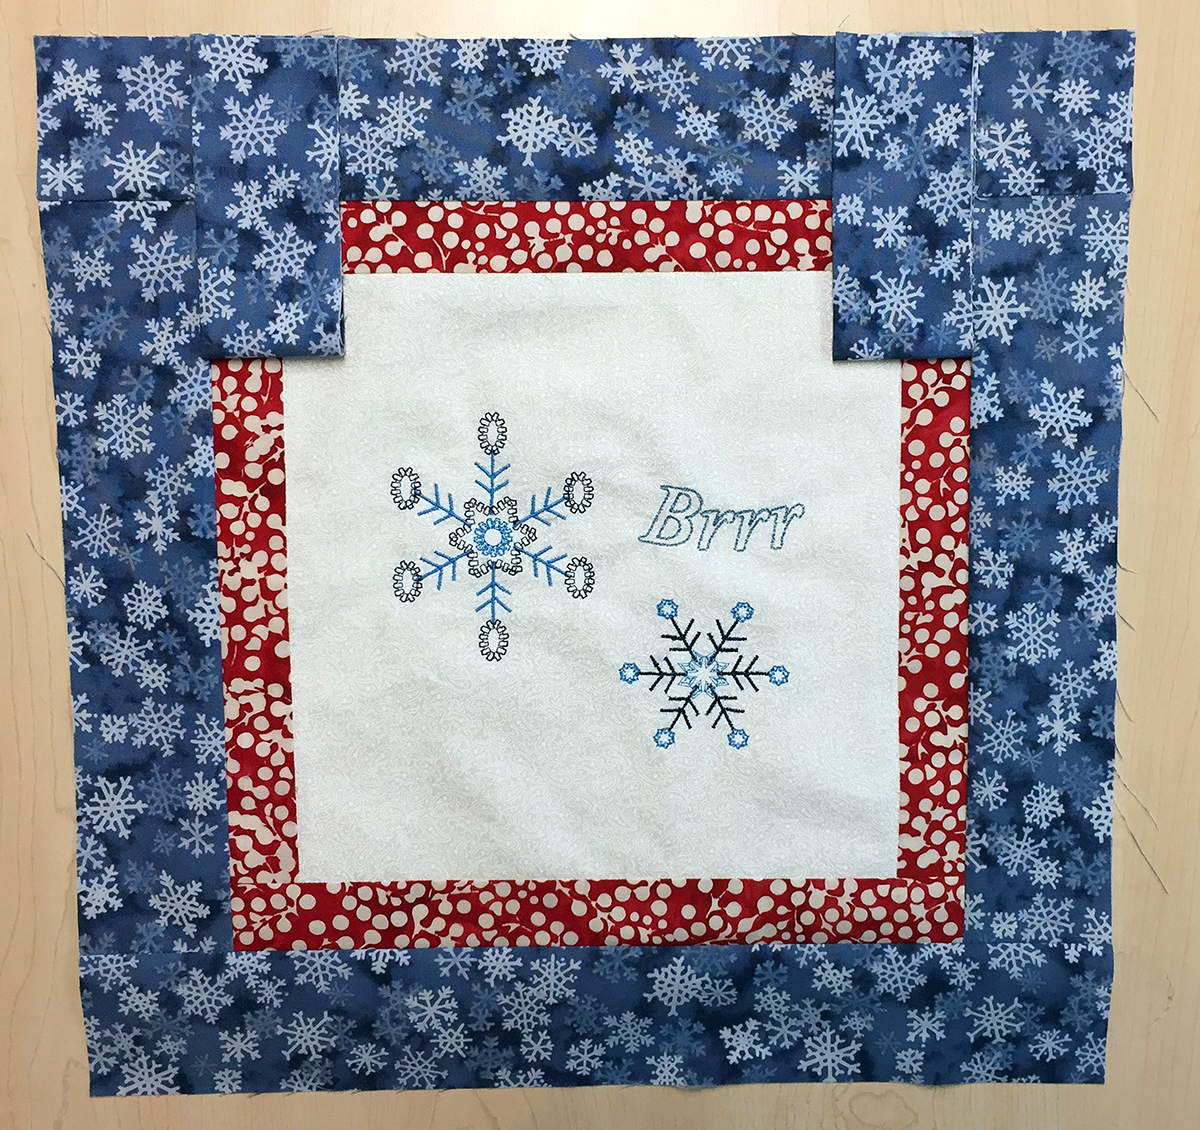
After the embroidery sandwich (my new technical term for the fabric and stabilizer) was removed from the hoop, it was time to trim it up to the desired size. In the case of this project, I wanted a 9 1/2" square. I tore away the stabilizer and was now ready to add some borders.

Time for some borders! I added this pop of red batik around the embroidered fabric for my first border. It was 1 1/2" wide, which gave me a 1" finished border.

I just happened to have some snowflake fabric that I knew would be perfect for this project. This second border was 2 1/2" wide to start, giving a second border finished width of 2".
I love to use hanging tabs for my smaller wall hangings, so next I created these to add to Snowflake Brrr! 2.0. I also like to avoid binding by using a pillowcase method for small projects, so I needed to insert the hanging tabs into the project before I stitched it all around. I layered my hanging tabs, with the raw edges matching the raw edge of the quilt top, then my quilt top and batting. Once these were all together, I put the backing, right side down, on the top of the above layers. I stitched all around the quilt sandwich with a ¼" seam, leaving a 3" - 4" opening to turn the project right side out.

I clipped the corners to reduce bulk and turned the project right side out. It can be a bit of a slow process, but persistence pays off and once Snowflake Brrr! 2.0 was turned right side out, all I had to do was hand stitch the opening closed before the project was ready for quilting.
I always want to know how people quilt their projects and hate the term "quilt as desired", so I won't leave you wondering how I quilted Snowflake Brrr! 2.0. I stitched in the ditch between the background and first border and between borders one and two and then added some swirls and loops in the background around the snowflakes. Pretty simple, but I wanted to be sure that the quilting didn't detract from the beautiful machine embroidery.

While I really liked the original Snowflake Brrr!, version 2.0 was much quicker to create and now that I have created the .JEF file, I can always stitch it out if I want to create another project as a gift. And... if I'm feeling creative, I can always spend some time switching out decorative stitches for other ones to see how that would look. With the Janome 500E, the possibilities are endless!
Creatively,

P.S. Did you know that Chatterbox Quilts provides FREE content to those on our mailing list? Yes, we do! Sign up here to receive FREE content directly in your email inbox every few weeks from Chatterbox Quilts. You'll be glad you did :)