What a Beginner Quilter Really Needs

When you first start quilting, you can quickly be overwhelmed by the notions and accessories that you "need" to quilt. Kim shows you what essentials you actually need to have in your tool kit when you first start quilting.

While you may add more items to your quilt studio as you progress in your quilting journey, you really need the following items to start:

A rotary cutter
A cutting mat (or self-healing mat)
A quilting ruler
An iron
A pressing surface (tutorial on making a pressing surface is below)
Pins
Seam ripper (yes, you will use this a time or two!)
Fabric
Batting
Multi-Purpose Quilt Spray (recipe and information below)
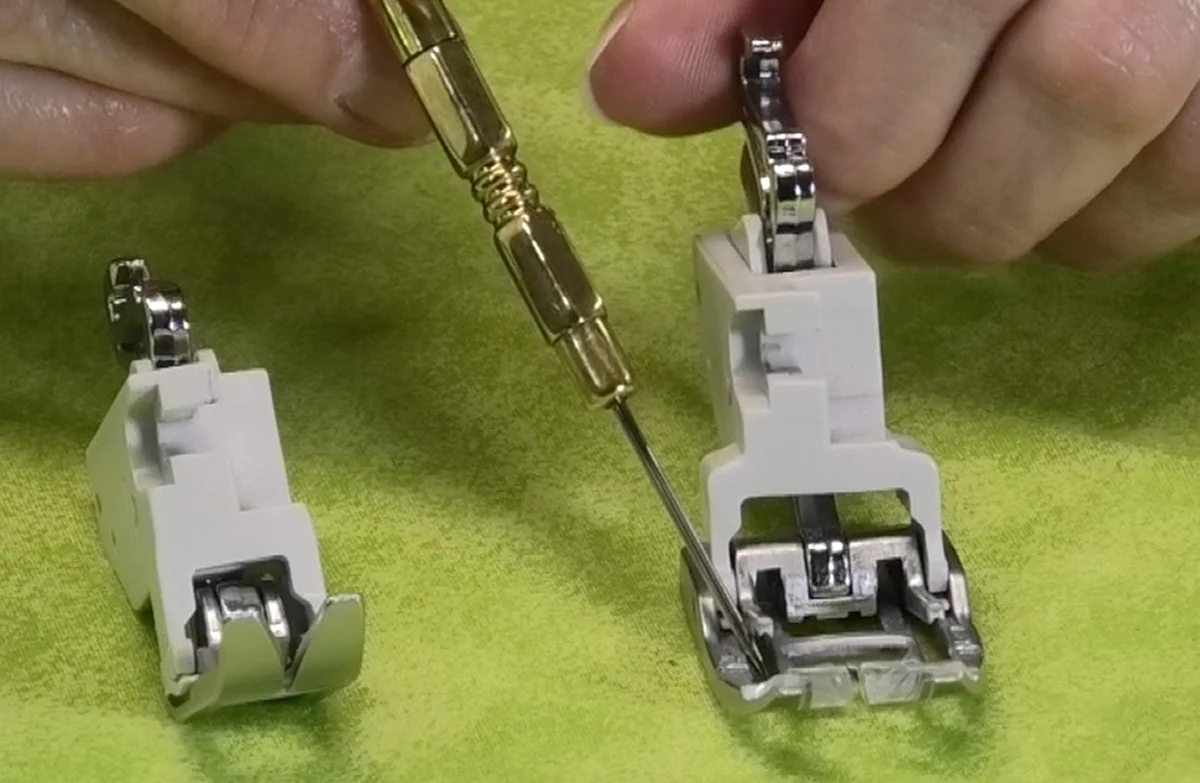
Sewing Machine with 1/4" foot, walking foot and free motion or darning foot

To learn more, click on the image below.

What are the essentials that you think a beginning quilter needs? Let me know in the comments below.

Creatively,

Kim's signature small aqua.jpg
 

P.S. Did you know that you can sign up to receive emails full of FREE quilting goodness? Click here to receive FREE content directly in your email inbox every few weeks from Chatterbox Quilts. I know you'll be glad you did!

Book Review: Pure & Simple

Pure & Simple by Maggie Bonanomi is full of 17 primitive projects inspired by the seasons. These include small decorative projects, including wall hangings, table runners, pin cushions, and similar items. All of the projects are wool appliqué and are simple designs that should intentionally look imperfect for that perfect primitive look.

 
Image courtesy of Martingale

Image courtesy of Martingale


The projects in Pure & Simple are good for beginners as the shapes are simple and not intricate, making for a quicker and more successful project.

The designs revolve around nature with flowers, branches, and vegetables in most of them.

 
Image courtesy of Martingale

Image courtesy of Martingale


The examples in the book are done in muted colours: beiges, browns, and soft earthen tones. You could certainly make these in more vibrant colours, if that was your preference. The limited number of fabrics means you don’t have to have a lot of different colours of wool to do these projects. This is helpful for beginning wool appliquérs as they don’t have to invest in large amounts of wool to do these projects.

 
Image courtesy of Martingale

Image courtesy of Martingale


There isn’t much information in the way of directions for working with wool for appliqué, so if you have never worked with wool before, you might want to research techniques for doing this to ensure you are successful when making the projects in Pure & Simple. Wool appliqué is easy and you don’t have to worry about the wool edges fraying, but if you are a complete beginner, you might want to have more directions than are included in this book.

Click on the image below for a more in-depth look at Pure & Simple.


If you'd like to add Pure & Simple to your quilt library, click here.

Creatively,

Kim's signature small aqua.jpg
 

P.S. Did you know that you can sign up to receive FREE emails full of quilting goodness? Just click here to receive FREE content directly in your email inbox every few weeks from Chatterbox Quilts. I know you'll be glad you did!

P.P.S. I am an Amazon affiliate and will receive a small amount of compensation if you purchase a product by clicking through links in this blogpost. This allows me to continue to provide you with FREE content each week. Thank you.

Walking Feet for the Janome MC9400

I really enjoy making improvisational quilt as you go (QAYG) projects and find that my AcuFeed Dual Foot and Holder (Twin) or AD foot that came with the Janome MC9400 is so helpful in quilting straight or wavy lines when I am making projects with this technique. If you're not familiar with the AD foot, you may recognize it as the walking foot or even feed foot. Yes, it's the one you will use for handling slippery fabrics, or, if you are a quilter, doing walking foot quilting. 

 
Cheryl's QAYG table runner - 10.jpg
 

I love using the AD foot, but have recently purchased an additional walking foot, the AcuFeed Foot with Foot Holder Single or VD foot. This foot is similar to the AD foot, but is narrower, allowing for use in areas where the AD foot may be just a bit too wide. 

 
Janome AD & VD foot.jpg
 

When I'm adding quilting to my QAYG projects, I like to use the edge of my presser foot to measure the space to where I want to lay down the next quilting line. When I want to have a narrow space between my quilting lines, the VD foot is perfect!

Both the AD foot and the VD foot work with the AcuFeed Flex system to move both the top and bottom fabrics along at the same rate. In order to use them with this system, you need to be sure that the AcuFeed Flex system is engaged on the Janome MC9400.

To see more information about both of these feet and how to use them with the AcuFeed Flex system on the Janome MC9400, click on the photo below.


Creatively,

Kim's signature small aqua.jpg
 

P.S. Did you know that you can sign up to receive emails full of FREE quilting goodness? Click here to receive FREE content directly in your email inbox every few weeks from Chatterbox Quilts. You'll be glad you did!

Book Review: Visible Mending

I found just the book I need! I recently bought a black semi-sheer top and didn't notice that it had two small holes near the hemline in the front. It wasn't until I got it home that I noticed them and was so disappointed. I wasn't sure what to do: whether I should darn the holes or try another solution, so the top has just been hanging in my closet. Enter the book I'm reviewing today: Visible Mending by Jenny Wilding Cardon.


While no one ever relishes mending, you might actually be looking for garments on which to do this once you take a look at this book! In Visible Mending, Jenny shows you five different ways to fix your favourite garments that may have just a bit too much wear on them. Two of these techniques involve hand work while the remaining ones can be done on the sewing machine.

Boro stitching and hand embroidery are both easy techniques and Jenny shows you various easy stitches on how to use these to fix holes in a top, sweater or other pieces of clothing.


If you want to use your sewing machine to mend those holes, there are sections on patching, darning, and mending by machine. Whatever technique you choose, the stitching is meant to be seen. This makes it easier, in my opinion, to do these repairs as you don't have to try to hide the fix.


For a closer look at Visible Mending, click on the photo below to watch a video on my YouTube channel.

If you are looking for creative ways to fix holes in your favourite clothing, get your own copy of Visible Mending by Jenny Wilding Cardon.

Creatively,

Kim's signature small aqua.jpg
 

P.S. Did you know that you can sign up to receive emails full of FREE quilting goodness? Click here to receive FREE content directly in your email inbox every few weeks from Chatterbox Quilts. I know you'll be glad you did!

P.P.S. I am an Amazon affiliate and will receive a small amount of compensation if you purchase a product by clicking through links in this blogpost. This allows me to continue to provide you with FREE content each week. Thank you.

How to Use Two Spools of Thread on the Janome MC9400

I get lots of questions about the thread stand I use on my Janome MC9400 to handle thread cones. As I own a long arm machine, I have more thread cones than spools and needed a way to use these on the Janome MC9400, so I purchased the optional two spool thread stand. This stand works well for using thread cones as well as handling stacked threads that should feed vertically, rather than horizontally.

The two spool thread stand comes with two vertical thread stands, two thread guides as well as two thread caps and an attachment to handle cones that can be taken off the vertical thread stand when not needed. The thread guides consist of two interconnected extendable metal poles that will lock into place with a slight twist when you extend them. They can be collapsed when not in use.

 
Images for Canva - 11.jpg
 

The stand also comes with a small thread guide that fits into the round hole that you'll see when you open up the top of the Janome MC9400. It's important to check with your local Janome dealer to get the right two spool thread stand because they are machine specific. If you get the wrong one, you'll find that this small thread guide won't fit into the appropriate hole.

 
Images for Canva - 14.jpg
 

Fitting the two spool thread guide onto your machine is quite simple. At the back of the Janome MC9400 there are two screws. These need to be taken out and the protrusions on the thread guide will fit right in. You then screw the screws back into the machine, putting them through the holes in the two spool thread stand first. 

To learn more about the two spool thread stand and how to attach it to your Janome MC9400, click on the photo below to watch a video on my YouTube channel.

Creatively,

Kim's signature small aqua.jpg
 

P.S. Did you know that you can sign up to receive FREE emails full of quilting goodness? Just click here to receive FREE content directly in your email inbox every few weeks from Chatterbox Quilts. I know you'll be glad you did!